One of the most important task in Linux systems administration, is process management. Its involves several operations under monitoring, signaling processes as well as setting processes priorities on the system.
There are numerous Linux tools/utilities designed for monitoring/handling processes such as top, ps, pgrep, kill, killall, nice coupled with many others.
In this article, we shall uncover how to find processes using a resourceful Linux utility called fuser.
Suggested Read: Find Top Running Processes by Highest Memory and CPU Usage
fuser is a simple yet powerful command line utility intended to locate processes based on the files, directories or socket a particular process is accessing. In short, it helps a system user identify processes using files or sockets.
How to Use fuser in Linux Systems
The conventional syntax for using fuser is:
# fuser [options] [file|socket]
# fuser [options] -SIGNAL [file|socket]
# fuser -l
Below are a few examples of using fuser to locate processes on your system.
Find Which Process Accessing a Directory
Running fuser command without any option will displays the PIDs of processes currently accessing your current working directory.
$ fuser .
OR
$ fuser /home/tecmint

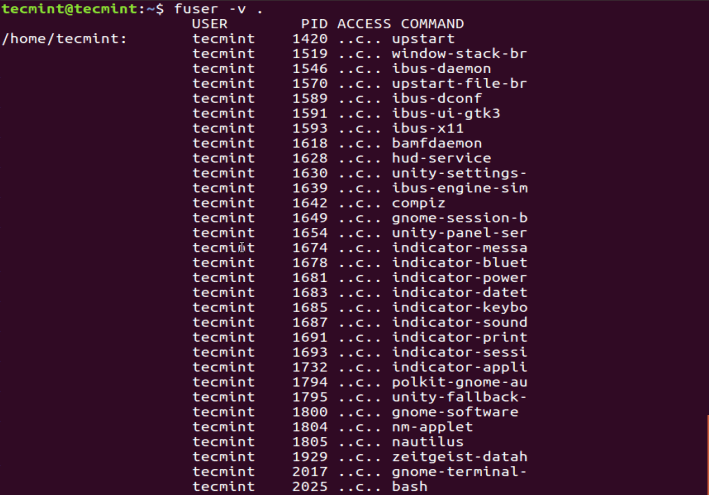
For a more detailed and clear output, enable the -v or --verbose as follows. In the output, fuser prints out the name of the current directory, then columns of the process owner (USER), process ID (PID), the access type (ACCESS) and command (COMMAND) as in the image below.
$ fuser -v

Under the ACCESS column, you will see access types signified by the following letters:
c– current directorye– an executable file being runf– open file, however, f is left out in the outputF– open file for writing, F is as well excluded from the outputr– root directorym– mmap’ed file or shared library
Find Which Process Accessing A File System
Next, you can determine which processes are accessing your ~.bashrc file like so:
$ fuser -v -m .bashrc
The option, -m NAME or --mount NAME means name all processes accessing the file NAME. In case you a spell out directory as NAME, it is spontaneously changed to NAME/, to use any file system that is possibly mounted on that directory.
Suggested Read: Find Top 15 Processes by Memory Usage in Linux
How to Kill and Signal Processes Using fuser
In this section we shall work through using fuser to kill and send signals to processes.
In order to kill a processes accessing a file or socket, employ the -k or --kill option like so:
$ sudo fuser -k .
To interactively kill a process, where you are that asked to confirm your intention to kill the processes accessing a file or socket, make use of -i or --interactive option:
$ sudo fuser -ki .

The two previous commands will kill all processes accessing your current directory, the default signal sent to the processes is SIGKILL, except when -SIGNAL is used.
Suggested Read: A Guide to Kill, Pkill and Killall Commands in Linux
You can list all the signals using the -l or --list-signals options as below:
$ sudo fuser --list-signals

Therefore, you can send a signal to processes as in the next command, where SIGNAL is any of the signals listed in the output above.
$ sudo fuser -k -SIGNAL
For example, this command below sends the HUP signal to all processes that have your /boot directory open.
$ sudo fuser -k -HUP /boot
Try to read through the fuser man page for advanced usage options, additional and more detailed information.
That is it for now, you can reach us by means of the feedback section below for any assistance that you possibly need or suggestions you wish to make.


Ravi, thank you for the article. Do you have any use cases involving fuser -u?
Cheers,
— Dave
Great Article. I’ve seen it a lot of times but never knew what fuser was for. Thanks for the great article. I’d buy you a coffee, but I’m really poor. Keep up the good work.
@Dane,
Thanks for your coffee and support…:)