This is the Part 2 of KVM series, here we will discuss how to deploy Linux virtual machines using network installation under KVM environment. We will discuss three types of network installation (FTP, NFS and HTTP), each one of them has its special prerequisites.

Before beginning, make sure that you have the prerequisites which we have mentioned in the first part of this series.
Network Installation using FTP
1. Before beginning we should install the ftp service package.
# yum install vsftpd
2. After vsftpd has been installed, then lets start and make it service permanently enabled.
# systemctl start vsftpd
# systemctl enable vsftpd
3. For security issues, you may need to add FTP service to the Firewall.
# firewall-cmd --permanent --add-service=ftp
# firewall-cmd –reload
4. Now it’s time to choose your prefer Linux ISO which you want to work on, in this part we use RHEL7 ISO. Let’s mount the ISO image under mount point (i.e. /mnt location). You also can create your custom mount point.
# mount -t iso9660 -o ro /path-to-iso/rhel-server-7.0-x86_64-dvd.iso /mnt/iso-mp/
5. Until now, we haven’t share anything under FTP server yet. The FTP default data path is /var/ftp/pub/ lets create new directory under it.
# mkdir /var/ftp/pub/RHEL7
6. Then Copy the mounted ISO contained files to it. You also can add ‘v’ option for verbose details while copying.
# cp -r /mnt/iso-mp/* /var/ftp/pub/RHEL7/
7. Finally lets restart vsftpd service and check the status of the service.
# systemctl restart vsftpd
# systemctl enable vsftpd
# systemctl status vsftpd
Sample Output
 vsftpd.service - Vsftpd ftp daemon
 Loaded: loaded (/usr/lib/systemd/system/vsftpd.service; enabled)
 Active: active (running)
 Main PID: 27275 (vsftpd)
8. Now its time for starting our GUI tool virt-manager.
# virt-manager
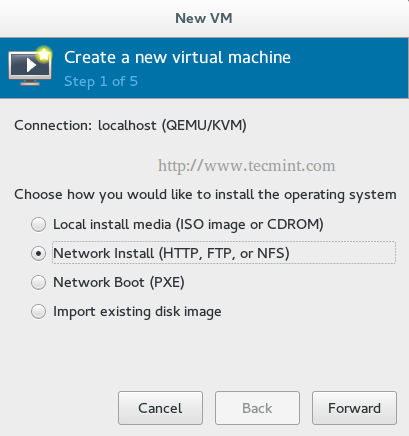
9. After starting ‘virt-manager‘, create new virtual machine then select Network install from this window.
10. When you have installed KVM packages at the first time, virtual bridge has been created to connect the virtual machine with the physical host. You could display its configuration using ifconfig command.
# ifconfig virbr0
Sample Output
virbr0: flags=4099<UP,BROADCAST,MULTICAST>  mtu 1500
        inet 192.168.124.1  netmask 255.255.255.0  broadcast 192.168.124.255
        inet6 fe80::5054:ff:fe03:d8b9  prefixlen 64  scopeid 0x20
        ether 52:54:00:03:d8:b9  txqueuelen 0  (Ethernet)
        RX packets 21603  bytes 1144064 (1.0 MiB)
        RX errors 0  dropped 0  overruns 0  frame 0
        TX packets 214834  bytes 1108937131 (1.0 GiB)
        TX errors 0  dropped 0 overruns 0  carrier 0  collisions 0
You will notice that IP: 192.168.124.1 is allocated to the virtual bridge vibr0.Virtual machines uses this IP to connect with the physical host. So, we could say that this IP is represent the physical host in the virtual network environment.
We will use this IP to provide the URL path to our FTP directory which contains the files of our ISO. If you have deploy your FTP server on another/remote host, just enter the IP of the other server instead of the previous IP.
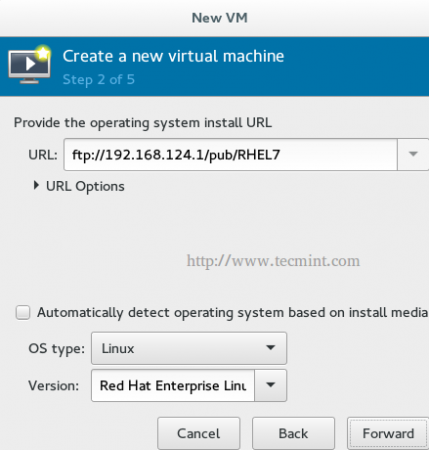
11. Then you will be asked about resources and storage as same as the previous part of our tutorial. After all there you will reach to this window or something like this.
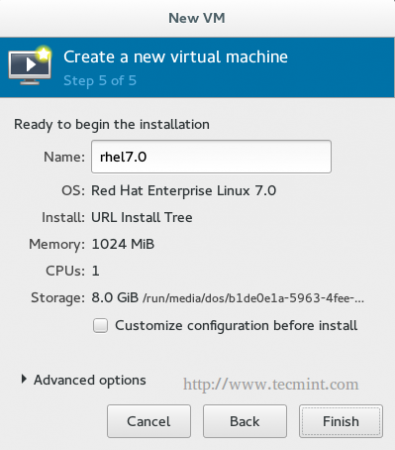
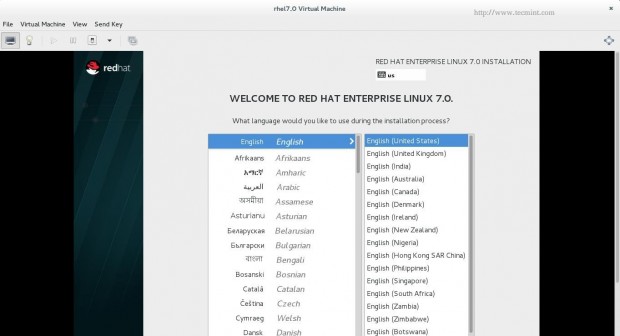
Press Finish , and enjoy with your new virtual machine.
Network Installation using NFS
1. We have almost the same steps here, install the nfs service package.
# yum install nfs-utils
2. Next, start the nfs service and add the service to firewall permanently.
# systemctl start nfs
# systemctl enable nfs
# firewall-cmd --permanent --add-service=nfs
# firewall-cmd –reload
3. Mount the Linux ISO.
# mount -t iso9660 -o ro /path-to-iso/rhel-server-7.0-x86_64-dvd.iso /mnt/iso-mp/
4. We could share this mount point using NFS share by editing /etc/exports.
#echo /mnt/iso-mp *(ro) > /etc/exports
5. Restart NFS service and check the service’s status.
# systemctl restart nfs
# systemctl status nfs
Sample Output
   nfs-server.service - NFS server and services
   Loaded: loaded (/usr/lib/systemd/system/nfs-server.service; disabled)
   Active: active (exited)
8. Start GUI tool ‘virt-manager‘.
# virt-manager
9. After starting ‘virt-manager‘, create new virtual machine then select Network install and then enter the URL path of NFS directory which contains the files of ISO. If you have deployed your NFS server on other remote machine, just enter the IP of that machine.
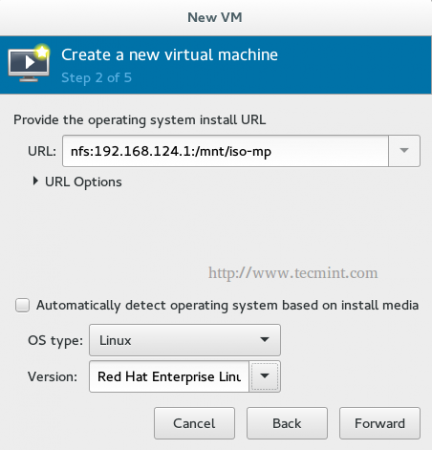
10. Then it will be asked you to enter resources and storage as same as discussed in the previous part of this series.. Just fill all these details and hit on ‘Finish’ button.
Network Installation Using HTTP
1. We also have almost the same steps here too, install the http service package, start it and enable it permanently on firewall.
# yum install httpd
# systemctl start httpd
# systemctl enable httpd
# firewall-cmd --permanent --add-service=httpd
# firewall-cmd –reload
2. Next, mount the ISO image under ‘/mnt/iso-mp‘ location.
# mount -t iso9660 -o ro /path-to-iso/rhel-server-7.0-x86_64-dvd.iso /mnt/iso-mp/
3. Until now we haven’t shared anything under HTTP server yet. The HTTP default data path is ‘/var/www/html‘, lets create a new directory under it.
# mkdir /var/www/html/RHEL7
4. Then Copy mounted ISO’s files to this directory.
# cp -r /mnt/iso-mp/* /var/www/html/RHEL7/
5. Restart httpd service and check the service’s status.
# systemctl restart httpd
# systemctl status httpd
Sample Output
httpd.service - The Apache HTTP Server
   Loaded: loaded (/usr/lib/systemd/system/httpd.service; disabled)
   Active: active (running)
 Main PID: 3650 (httpd)
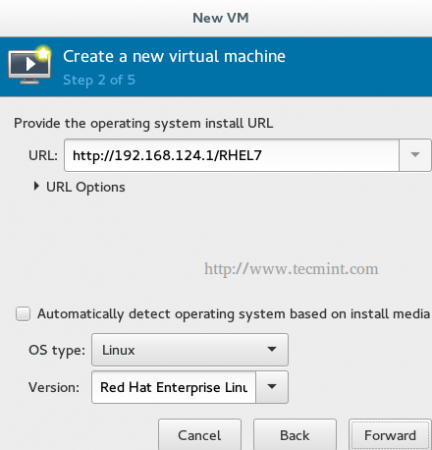
6. Next start the ‘virt-manager‘, create a new virtual machine then select Network install and enter HTTP directory path url, which contains the files of ISO image and follow the procedure as discussed above..
Conclusion
We have discussed how to deploy Linux virtual machine using network installation. Network install is very preferred over local installation due to centralization which help you to deploy one central installation source, all servers/machine use it to deploy their operating system. This really reduced the wasted installation time in the huge environments.



Increase Memory on the Virtual Machine to 2Gig and it will work with above guides.
Hi, i am using your instructions here to deploy with FTP/HTTP/NFS – the installation always stalled here:
dracut-initqueue[612]: Warning: Could not boot.
dracut-initqueue[612]: Warning: /dev/root does not exist
Starting Dracut Emergency shell…
Warning: /dev/root does not exist
Generating “/run/initramfs” rdsoreport.txt
Entering emergency mode. Exit the shell to continue.
Type “journalctl” to view system logs.
====
I am using RHEL7 – 3.10.0-123.el7.x86_64
======
output of ‘systemctl status network’ shows issue with “lo” – not sure this affects the issue
[root@vmm ~]# systemctl status network
network.service – LSB: Bring up/down networking
Loaded: loaded (/etc/rc.d/init.d/network)
Active: active (exited) since Tue 2016-05-10 13:33:48 EDT; 21min ago
Process: 1167 ExecStart=/etc/rc.d/init.d/network start (code=exited, status=0/SUCCESS)
May 10 13:33:47 vmm.example.com network[1167]: Bringing up loopback interface: Could not load file ‘/etc/sysconfig/network-scripts/ifcfg-lo’
May 10 13:33:47 vmm.example.com network[1167]: Could not load file ‘/etc/sysconfig/network-scripts/ifcfg-lo’
Thanks in advance of any advice