Logical Volume management has great features such as snapshots and Thin Provisioning. Previously in (Part – III) we have seen how to snapshot the logical volume. Here in this article, we will going to see how to setup thin Provisioning volumes in LVM.

What is Thin Provisioning?
Thin Provisioning is used in lvm for creating virtual disks inside a thin pool. Let us assume that I have a 15GB storage capacity in my server. I already have 2 clients who has 5GB storage each. You are the third client, you asked for 5GB storage. Back then we use to provide the whole 5GB (Thick Volume) but you may use 2GB from that 5GB storage and 3GB will be free which you can fill it up later.
But what we do in thin Provisioning is, we use to define a thin pool inside one of the large volume group and define the thin volumes inside that thin pool. So, that whatever files you write will be stored and your storage will be shown as 5GB. But the full 5GB will not allocate the entire disk. The same process will be done for other clients as well. Like I said there are 2 clients and you are my 3rd client.
So, let us assume how much total GB I have assigned for clients? Totally 15GB was already completed, If someone comes to me and ask for 5GB can I give? The answer is “Yes“, here in thin Provisioning I can give 5GB for 4th Client even though I have assigned 15GB.
Warning: From 15GB, if we are Provisioning more than 15GB it is called Over Provisioning.
How it Works? and How we provide storage to new Clients?
I have provided you 5GB but you may used only 2GB and other 3GB will be free. In Thick Provisioning we can’t do this, because it will allocate the whole space at first itself.
In thin Provisioning if I’m defining 5GB for you it won’t allocate the whole disk space while defining a volume, it will grow till 5GB according to your data write, Hope you got it! same like you, other clients too won’t use the full volumes so there will be a chance to add 5GB to a new client, This is called over Provisioning.
But it’s compulsory to monitored each and every volume growth, if not it will end-up in a disaster. While over Provisioning is done if the all 4 clients write the data’s badly to disk you may face an issue because it will fill up your 15GB and overflow to get drop the volumes.
Requirements
- Create Disk Storage with LVM in Linux – PART 1
- How to Extend/Reduce LVM’s in Linux – Part II
- How to Create/Restore Snapshot of Logical Volume in LVM – Part III
My Server Setup
- Operating System – CentOS 6.5 with LVM Installation
- Server IP – 192.168.0.200
Step 1: Setup Thin Pool and Volumes
Let’s do it practically how to setup the thin pool and thin volumes. First we need a large size of Volume group. Here I’m creating Volume group with 15GB for demonstration purpose. Now, list the volume group using the below command.
# vgcreate -s 32M vg_thin /dev/sdb1

Next, check for the size of Logical volume availability, before creating the thin pool and volumes.
# vgs
# lvs

We can see there is only default logical volumes for file-system and swap is present in the above lvs output.
Creating a Thin Pool
To create a Thin pool for 15GB in volume group (vg_thin) use the following command.
# lvcreate -L 15G --thinpool tp_tecmint_pool vg_thin
- -L – Size of volume group
- –thinpool – To o create a thinpool
- tp_tecmint_pool– Thin pool name
- vg_thin – Volume group name were we need to create the pool
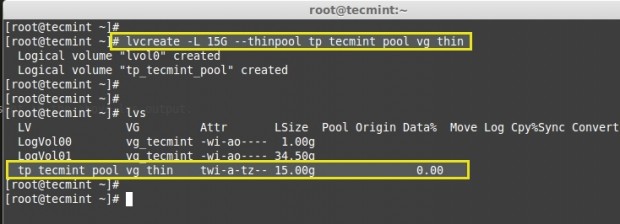
To get more detail we can use the command ‘lvdisplay’.
# lvdisplay vg_thin/tp_tecmint_pool
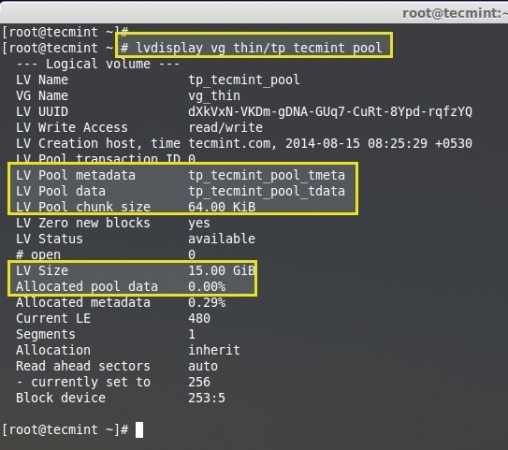
Here we haven’t created Virtual thin volumes in this thin-pool. In the image we can see Allocated pool data showing 0.00%.
Creating Thin Volumes
Now we can define thin volumes inside the thin pool with the help of ‘lvcreate’ command with option -V (Virtual).
# lvcreate -V 5G --thin -n thin_vol_client1 vg_thin/tp_tecmint_pool
I have created a Thin virtual volume with the name of thin_vol_client1 inside the tp_tecmint_pool in my vg_thin volume group. Now, list the logical volumes using below command.
# lvs

Just now, we have created the thin volume above, that’s why there is no data showing i.e. 0.00%M.
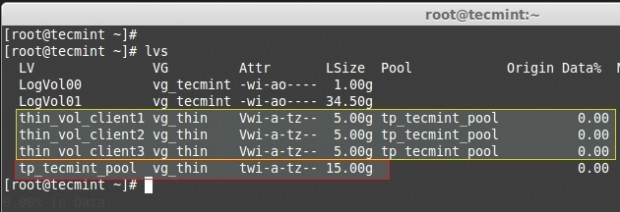
Fine, let me create 2 more Thin volumes for other 2 clients. Here you can see now there are 3 thin volumes created under the pool (tp_tecmint_pool). So, from this point, we came to know that I have used all 15GB pool.
Creating File System
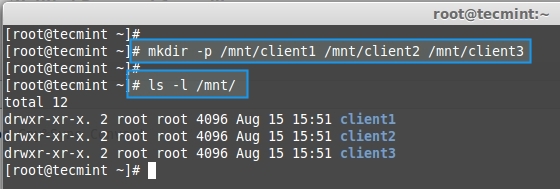
Now, create mount points and mount these three thin volumes and copy some files in it using below commands.
# mkdir -p /mnt/client1 /mnt/client2 /mnt/client3
List the created directories.
# ls -l /mnt/
Create the file system for these created thin volumes using ‘mkfs’ command.
# mkfs.ext4 /dev/vg_thin/thin_vol_client1 && mkfs.ext4 /dev/vg_thin/thin_vol_client2 && mkfs.ext4 /dev/vg_thin/thin_vol_client3

Mount all three client volumes to the created mount point using ‘mount’ command.
# mount /dev/vg_thin/thin_vol_client1 /mnt/client1/ && mount /dev/vg_thin/thin_vol_client2 /mnt/client2/ && mount /dev/vg_thin/thin_vol_client3 /mnt/client3/
List the mount points using ‘df’ command.
# df -h
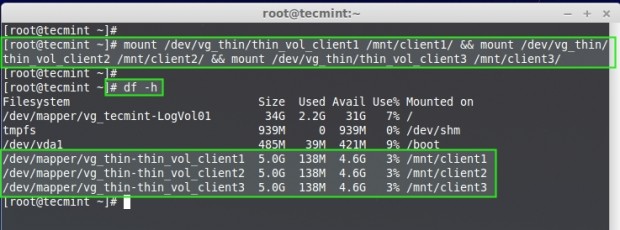
Here, we can see all the 3 clients volumes are mounted and therefore only 3% of data are used in every clients volumes. So, let’s add some more files to all 3 mount points from my desktop to fill up some space.

Now list the mount point and see the space used in every thin volumes & list the thin pool to see the size used in pool.
# df -h
# lvdisplay vg_thin/tp_tecmint_pool
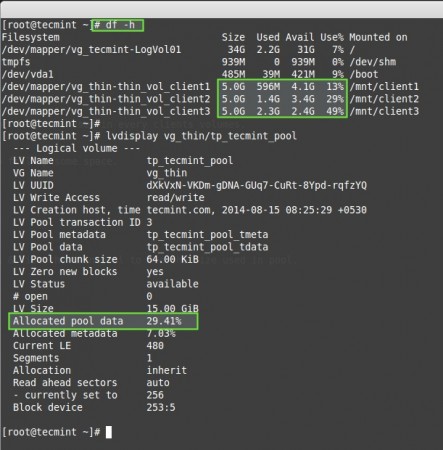
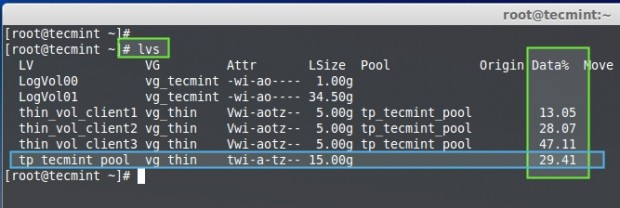
The above command shows, the three mount pints along with their sizes in percentage.
13% of datas used out of 5GB for client1
29% of datas used out of 5GB for client2
49% of datas used out of 5GB for client3
While looking into the thin-pool we can see only 30% of data is written totally. This is the total of above three clients virtual volumes.
Over Provisioning
Now the 4th client came to me and asked for 5GB storage space. Can I give? Because I had already given 15GB Pool to 3 clients. Is it possible to give 5GB more to another client? Yes it is possible to give. This is when we use Over Provisioning, which means giving the space more than what I have.
Let me create 5GB for the 4th Client and verify the size.
# lvcreate -V 5G --thin -n thin_vol_client4 vg_thin/tp_tecmint_pool
# lvs
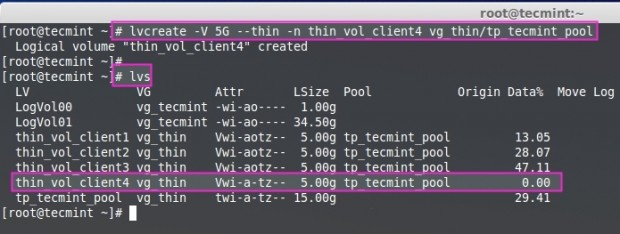
I have only 15GB size in pool, but I have created 4 volumes inside thin-pool up-to 20GB. If all four clients start to write data to their volumes to fill up the pace, at that time, we will face critical situation, if not there will no issue.
Now I have created file system in thin_vol_client4, then mounted under /mnt/client4 and copy some files in it.
# lvs
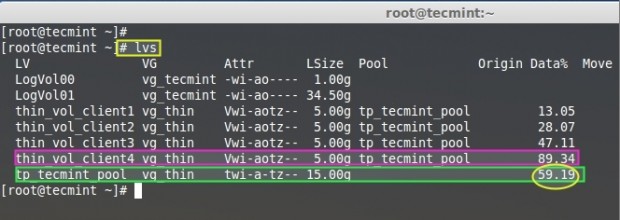
We can see in the above picture, that the total used size in newly created client 4 up-to 89.34% and size of thin pool as 59.19% used. If all these users are not writing badly to volume it will be free from overflow, drop. To avoid the overflow we need to extend the thin-pool size.
Important: Thin-pools are just a logical volume, so if we need to extend the size of thin-pool we can use the same command like, we’ve used for logical volumes extend, but we can’t reduce the size of thin-pool.
# lvextend
Here we can see how to extend the logical thin-pool (tp_tecmint_pool).
# lvextend -L +15G /dev/vg_thin/tp_tecmint_pool

Next, list the thin-pool size.
# lvs
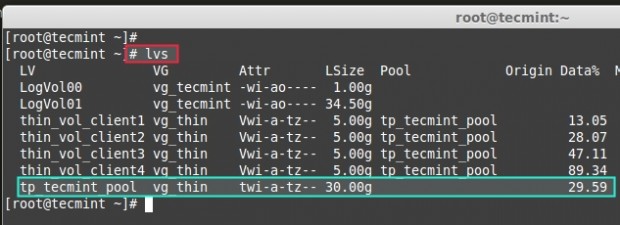
Earlier our tp_tecmint_pool size was 15GB and 4 thin volumes which was over Provision by 20GB. Now it has extended to 30GB so our over Provisioning has been normalized and thin volumes are free from overflow, drop. This way you can add ever more thin volumes to the pool.
Here, we have seen how to create a thin-pool using a large size of volume group and create thin-volumes inside a thin-pool using Over-Provisioning and extending the pool. In the next article we will see how to setup a lvm Striping.





Hi @Babin Lonston,
What a great explanation! Thank you!. There is a typo in the command below. You wrote in the article that you created 15gb here 32 MB.
@Hasan,
No, it’s not a typo. (-s 32M) means we are using our own defined physical extend size while creating the volume group instead of default size 4 MB. To get more clarity on this have a look into https://www.tecmint.com/create-lvm-storage-in-linux/.
I am getting this error while creating thinpool. Do i need to install any package for thinpool and how?
@Madhav,
What verion of RHEL 6 you using?
Thanks & Regards,
Babin Lonston
Red Hat Enterprise Linux Server release 6.2 (Santiago)
this is the version i am using
After_Done_Thin_VOLLUME_Mounting,Is_There_Need_to_DO_Permanent_Mounting?