In the previous article of this Ansible series, we explained that Ansible is an agent-less tool that allows you to quickly and efficiently manage multiple machines (also known as nodes – and perform deployments to them as well) from a single system.

After installing the software in the controller machine, creating the keys for passwordless login and copying them to the nodes, it’s time to learn how to optimize the process of managing such remote systems using Ansible.
Ansible Testing Environment
Throughout this article, as well as the next one, we will use the following test environment. All hosts are CentOS 7 boxes:
Controller machine (where Ansible is installed): 192.168.0.19
Node1: 192.168.0.29
Node2: 192.168.0.30
In addition, please note that both nodes have been added in the webservers section of the local /etc/ansible/hosts file:

That said, let’s get started with the topic at hand.
Introducing Ansible Playbooks
As described in the previous guide, you can use the ansible utility to run commands in remote nodes as follows:
# ansible -a "/bin/hostnamectl --static" webservers

In the example above, we ran hostnamectl --static on node1 and node2. It doesn’t take long for one to realize that this method of running tasks on remote computers works fine for short commands but can quickly become burdensome or messy for more complex tasks that require further well-structured configuration parameters or interactions with other services
For example, setting up and configuring WordPress on multiple hosts – which we will cover in the next article of this series). This is where Playbooks come into scene.
Simply put, Playbooks are plain text files written in the YAML format, and contain a list with items with one or more key/value pairs (also known as a “hash” or a “dictionary”).
Inside each Playbook you will find one or more group of hosts (each one of these groups is also called a play) where the desired tasks are to be performed.
An example from the official docs will help us to illustrate:
1. hosts: this is a list of machines (as per /etc/ansible/hosts) where the following tasks will be performed.
2. remote_user: remote account that will be used to perform the tasks.
3. vars: variables used to modify the behavior of the remote system(s).
4. tasks are executed in order, one at a time, against all machines that match hosts. Within a play, all hosts are going to get the same task directives.
If you need to execute a different set of associated tasks for a specific host, create another play in the current Playbook (in other words, the purpose of a play is to map a specific selection of hosts to well-defined tasks).
In that case, start a new play by adding the hosts directive at the bottom and starting over:
---
- hosts: webservers
  remote_user: root
  vars:
    variable1: value1
    variable2: value2
  remote_user: root
  tasks:
  - name: description for task1
    task1: parameter1=value_for_parameter1 parameter2=value_for_parameter2
  - name: description for task1
    task2: parameter1=value_for_parameter1 parameter2=value_for_parameter2
  handlers:
    - name: description for handler 1
      service: name=name_of_service state=service_status
- hosts: dbservers
  remote_user: root
  vars:
    variable1: value1
    variable2: value2
…
5. handlers are actions that are triggered at the end of the tasks section in each play, and are mostly used to restart services or trigger reboots in the remote systems.
# mkdir /etc/ansible/playbooks
And a file named apache.yml inside of there with the following contents:
---
- hosts: webservers
  vars:
    http_port: 80
    max_clients: 200
  remote_user: root
  tasks:
  - name: ensure apache is at the latest version
    yum: pkg=httpd state=latest
  - name: replace default index.html file
    copy: src=/static_files/index.html dest=/var/www/html/ mode=0644
    notify:
    - restart apache
  - name: ensure apache is running (and enable it at boot)
    service: name=httpd state=started enabled=yes
  handlers:
    - name: restart apache
      service: name=httpd state=restarted
Second, create a directory /static_files:
# mkdir /static_files
where you will store the custom index.html file:
<!DOCTYPE html>
 <html lang="en">
 <head>
 <meta charset="utf-8"/>
 </script>
 </head>
 <body>
 <h1>Apache was started in this host via Ansible</h1><br>
<h2>Brought to you by Tecmint.com</h2>
 </body>
 </html>
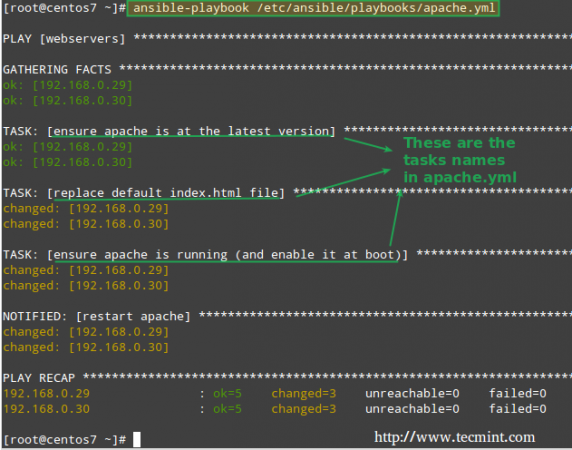
That said, now it’s time to use this playbook to perform the tasks mentioned earlier. You will note that Ansible will go through each task by host, one at a time, and will report on the status of such tasks:
# ansible-playbook /etc/ansible/playbooks/apache.yml
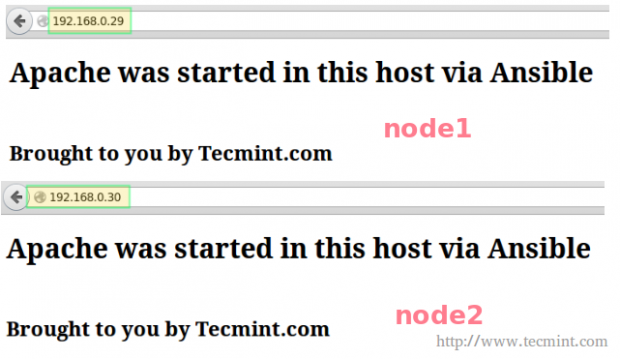
Now let’s see what happens when we open a browser and point it to 192.168.0.29 and 192.168.0.30:
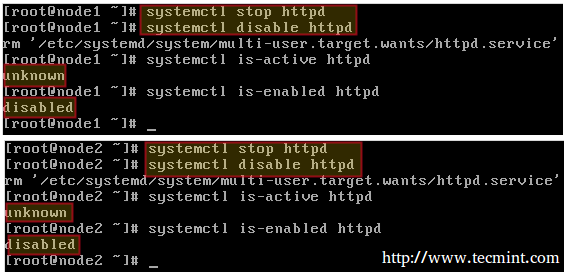
Let’s go one step further and manually stop and disable Apache on node1 and node2:
# systemctl stop httpd
# systemctl disable httpd
# systemctl is-active httpd
# systemctl is-enabled httpd
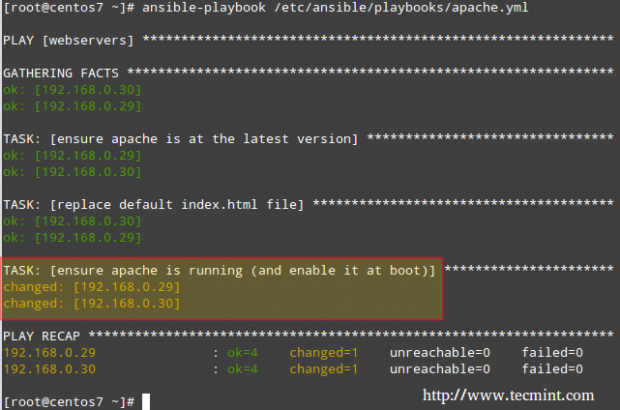
Then run again,
# ansible-playbook /etc/ansible/playbooks/apache.yml
This time, the task reports that the Apache web server was started and enabled on each host:
Please consider the above example as a glimpse of the power of Ansible. While these are relatively easy tasks when performed on a small number of servers, it can become very tedious and time-consuming if you need to do the same in several (perhaps hundreds) of machines.
Summary
In this article we have described how to run commands and execute complex tasks on several remote hosts simultaneously using Ansible. The official documentation and the GitHub repository provide a lot of examples and guides on how to use Ansible to achieve almost any imaginable task.
As you start learning how to automate tasks on remote Linux hosts using Ansible, we would like to hear your thoughts. Questions, comments, and suggestions are also always welcome, so feel free to contact us using the form below any time.





Hello TecMint Team,
Need your small help, I want to collect multi-data from at least 50 servers like their RAM, os-version, Disk space,kernel-version, and so on things, I have created one script there I am able to get data as required at the remote host, but I want that all 50 remote host data which available at there /tmp/report-1. I want to fetch and override all 50 server data into one file at a local ansible machine.
Thanks in advance for your help.
Best Regards,
Wajid Shaikh
Hi All
Can anyone tell me how to set hostname using ansible. Please find the given below requirement.
I have 100 servers and I want set hostname like web01 for first server and second server web02 and so on. Please help me out for the same.
I have also use ansible module hostname but it works only when I am set same hostname in 100 servers.