Linux is a very popular Operating System (OS) amongst programmers and regular users. One of the main reasons for its popularity is its exceptional command line support. We can manage the entire Linux operating system via command line interface (CLI) only. This allows us to accomplish complex tasks with a just few commands.
In this guide, we will discuss some commonly used commands that are useful for experienced sysadmin or a beginner. After following this guide, users will be able to operate the Linux system confidently.
For better organization, these commands are grouped under three sections – file system, networking, and system information.
Linux File System Commands
In this section, we will discuss some of the useful commands related to files and directories in Linux.
1. cat Command
The cat command is mainly used to display the file contents. It reads the content of the file and displays them on the standard output (stdout).
The common syntax of the cat command is:
$ cat [OPTIONS] [FILE1] [FILE2] ...
Let’s display the contents of the /etc/os-release file using the cat command:
$ cat /etc/os-release

Additionally, we can also use the -n option of the command to display the contents with the line number:
$ cat -n /etc/os-release

2. cp Command
The cp command is useful for copying files, groups of files, and directories.
The common syntax of the cp command is:
$ cp [OPTIONS]
Here, the square brackets ([]) represent the optional arguments whereas angular brackets (<>) represent the essential arguments.
Let’s copy the /etc/os-release file to the /tmp directory:
$ cp /etc/os-release /tmp/new-file.txt
Now, let’s display the contents of the file to verify the file has been copied:
$ cat /tmp/new-file.txt
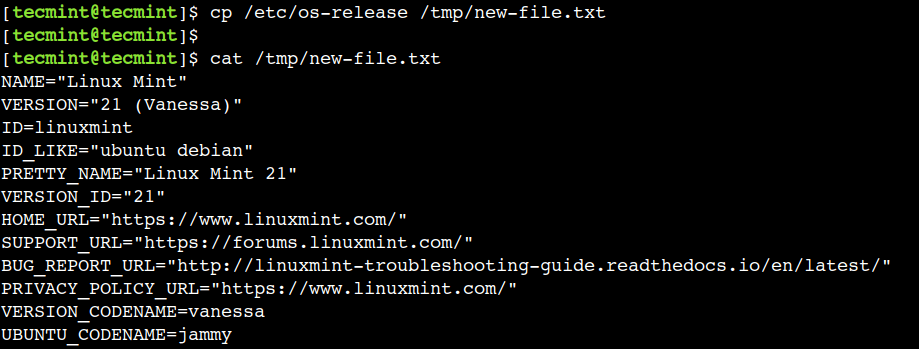
Similarly, we can copy the directory using the cp command. Let’s copy the /etc/cron.d directory inside the /tmp directory:
$ cp -r /etc/cron.d /tmp
We have used the -r option with the cp command, which represents the recursive operation. It copies the directory recursively which includes its files and sub-directories.
In the next example, we will see how to verify that the directory has been copied successfully.
$ ls /tmp/cron.d
$ ls -l /tmp/cron.d

3. ls Command
The ls command is used to list the directory contents and sort files by size and last modified time in descending order.
The common syntax of the ls command is:
$ ls [OPTIONS] [FILE1] [FILE2] ...
If we don’t provide any argument to the ls command then it lists the contents of the current directory.
$ ls
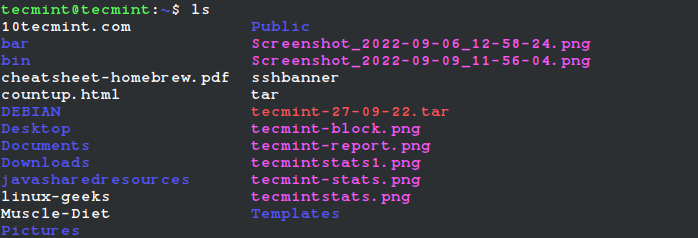
In the previous example, we copied the /etc/cron.d directory to the /tmp directory. Let’s verify that is present there and contains the required files:
$ ls /tmp/cron.d
We can use the -l option with the ls command to display more detailed information like – file permissions, owner, timestamp, size, etc.
Let’s find out more details about the files present in the /tmp/cron.d directory:
$ ls -l /tmp/cron.d

4. mkdir Command
We often create a directory structure to organize the contents. In Linux, we can use the mkdir command to create a directory or multiple directories and set the correct permissions for the directories.
The common syntax of the mkdir command is:
$ mkdir [OPTIONS] <DIRECTORY1> <DIRECTORY2> ...
Let’s create a directory with the name dir-1 in the /tmp directory:
$ mkdir /tmp/dir-1
Now, let’s verify that the directory has been created:
$ ls /tmp/dir-1
Here, we can see that the ls command doesn’t report any error which means the directory is present there.
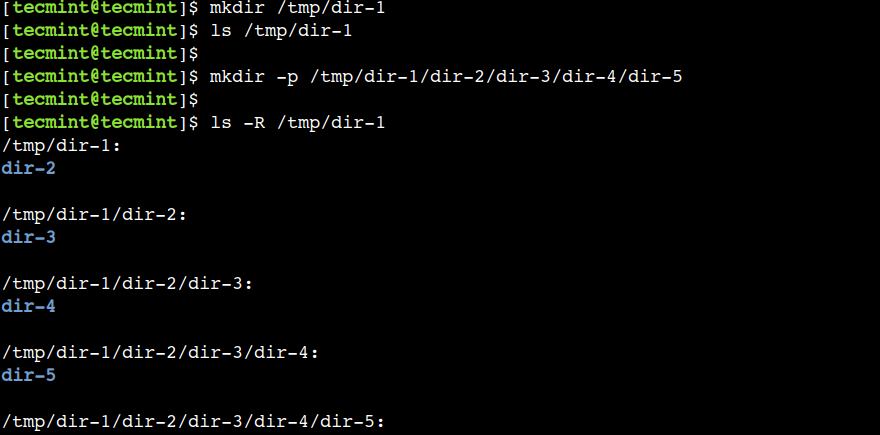
Sometimes, we need to create a nested directory structure for better data organization. In such cases, we can use the -p option of the command to create a few nested directories under the /tmp/dir-1 directory:
$ mkdir -p /tmp/dir-1/dir-2/dir-3/dir-4/dir-5
In the above example, we have created 4 levels of the nested directories. Let’s confirm it using the ls command:
$ ls -R /tmp/dir-1
Here, we have used the -R option with the command to display the directory contents in a recursive way.
5. history Command
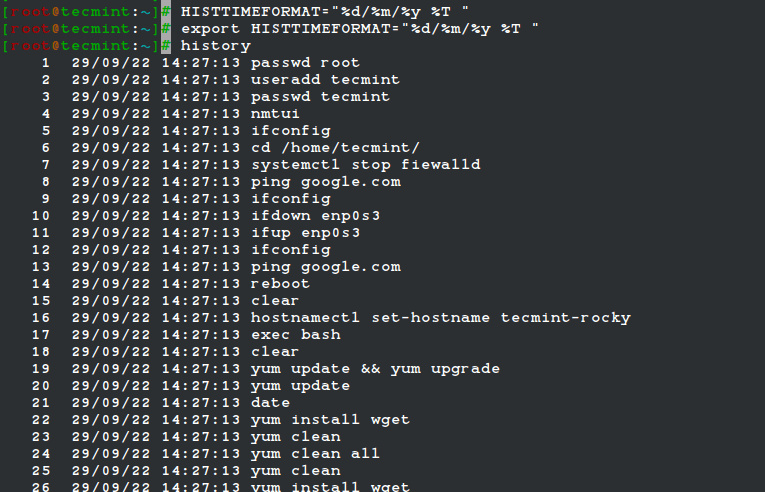
To audit the last executed commands, you can use the history command, which displays the list of last executed commands in a terminal session.
$ history
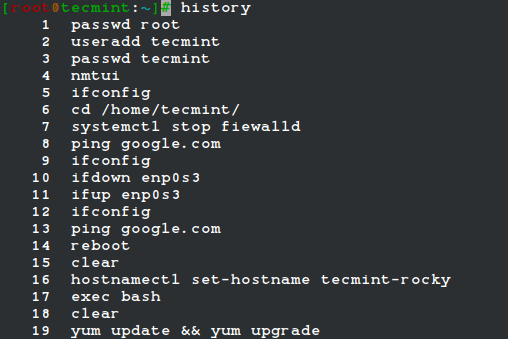
To view the command history with a time stamp, you need to set the timestamp in bash history, run:
$ HISTTIMEFORMAT="%d/%m/%y %T "             #Temporarily set the history timestamp
$ export HISTTIMEFORMAT="%d/%m/%y %T "      #Permanently set the history timestamp
$ history
6. du Command
How will you check the top 10 files that are eating out your disk space? A simple one-liner script made from the du command, which is primarily used for file space usage.
$ du -hsx * | sort -rh | head -10

Explanation of above du command options and switches.
- du – Estimate file space usage.
- -hsx –
(-h)Human Readable Format,(-s)Summaries Output,(-x)One File Format, skip directories on other file formats. - sort – Sort text file lines.
- -rh –
(-r)Reverse the result of the comparison,(-h)to compare the human-readable format. - head – output first n lines of file.
7. stat Command
The stat command is used to get the information about the file size, access permission, access time, and the user ID and group ID of the file.
$ stat anaconda-ks.cfg

Linux Networking Commands
In this section, we will discuss some of the networking commands that beginners can use to troubleshoot network-related issues.
8. ping Command
One of the very common operations performed in any network is to check if a particular host is reachable or not. We can use the ping command to check the connectivity with the other host.
The general syntax of the ping command is:
$ ping [OPTIONS] <destination>
Here, the destination can be an IP address or a Fully Qualified Domain Name (FQDN) such as google.com. Let’s verify that the current system can communicate with google:
$ ping -c 4 google.com

In the above example, the command shows the statistics about network communication, which shows that the response is received for all four network requests (packets). It is important to note that, we have used the -c option with the command to limit the number of requests to be sent to the particular host.
Let’s see the example when the communication between the two hosts is broken.
To simulate this scenario, we will try to reach a non-reachable IP address. In this case, it is 192.168.10.100:
$ ping -c 4 192.168.10.100

Here, we can see that we didn’t receive a response for any network request. Hence the command reports the error – Destination Host Unreachable.
9. host Command
Sometimes, we need to find the IP address of the particular domain. To achieve this, we can use the host command, which performs a DNS lookup and translates FQDN to IP address and vice-versa.
The general syntax of the host command is:
$ host [OPTIONS] <destination>
Here, the destination can be an IP address or FQDN.
Let’s find out the IP address of google.com using the host command:
$ host google.com

10. whois Command
All the details about the registered domains are stored in the centralized database and can be queried using the whois command, which shows details about the particular domain.
The general syntax of the whois command is:
$ whois [OPTIONS] <FQDN>
Let’s find out details of the google.com:
$ whois google.com
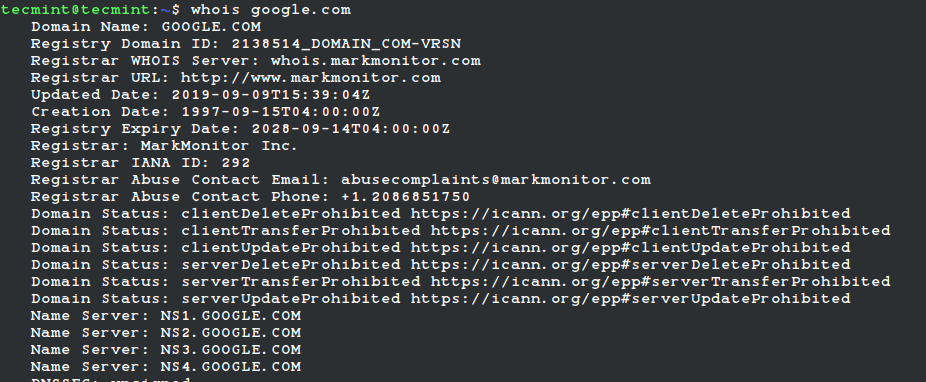
Here, we can see much detailed information like – domain registration/renew/expiration date, domain provider, and so on.
It is important to note that, the whois command is not available by default on all systems. However, we can install it using the package manager. For example, on Debian-based distributions we can install it using the apt package manager:
$ sudo apt install whois
On RHEL-based and other distributions, you can install it as shown.
$ sudo yum install whois         [On RHEL/CentOS/Fedora and Rocky Linux/AlmaLinux]
$ sudo emerge -a net-misc/whois  [On Gentoo Linux]
$ sudo apk add whois             [On Alpine Linux]
$ sudo pacman -S whois           [On Arch Linux]
$ sudo zypper install whois      [On OpenSUSE]
Linux System Information Commands
In this section, we will discuss some of the commands that can provide details about the current system.
11. uptime Command
It’s a very common requirement to find when the system was rebooted last time using the uptime command, which tells how long the system has been running.
Let’s find out the uptime of the current system:
$ uptime -p

12:10:57 up  2:00,  1 user,  load average: 0.48, 0.60, 0.45
In this example, we have used the -p option to show the output in the pretty form.
12. free Command
Users often need to find the details about the installed, available, and used memory. This information plays an important role while troubleshooting performance issues. We can use the free command to find the details about the memory:
$ free -m
Here, we have used the -m option with the command which shows the output in the mebibytes.

In a similar way, we can the -g, -t, and -p options to show the output in the gibibytes, tebibytes, and pebibytes respectively.
13. lsblk Command
Computer systems store data on block devices. Examples of block devices are Hard Disk Drives (HDD), Solid State Drives (SSD), and so on. We can use the lsblk command to display detailed information about the block devices:
$ lsblk
In this example, we can see that there is only one block device and its name is /dev/sda. There are three partitions created on that block device.

In this article, we discussed some of the commands that are useful for Linux beginners. First, we discussed the file system commands. Then we discussed networking commands. Finally, we discussed some commands that provided details about the current system.




$ export HISTTIMEFORMAT=”%d/%m/%y %T ” #Permanently set the history timestamp
It will be ‘more permanent’ if you add this to .bashrc or .bash_aliases.
The command shows the statistics about network communication, which shows that the response is received for all four network requests (packets). It is important to note that, we have used the y which includes its files and sub-directories.
What is the practical application for #5 other than idle entertainment?
Number – 3 is quite useful and used frequently.
In 3rd point that is # du -hsx * | sort -rh | head -6., you use -rh and you explained for -rf.
I think its just a mismatch….
Here -h is for compare human readable numbers (e.g., 2K 1G)….
Thanks @ Naagabaabu for pointing that out. That was a mistake on our part.
Corrected in Writeup.