Linux users often need to use one command over and over again. Typing or copying the same command over and over again reduces your productivity and distracts you from what you are supposed to be doing.
You can save yourself some time by creating aliases for your most commonly used commands. Aliases are like custom shortcuts that represent a command (or set of commands) that can be executed with or without custom options. Chances are you are already using aliases on your Linux system without even knowing it.
List Currently Defined Aliases in Linux
You can see a list of defined aliases on your profile by simply executing the alias command.
$ alias
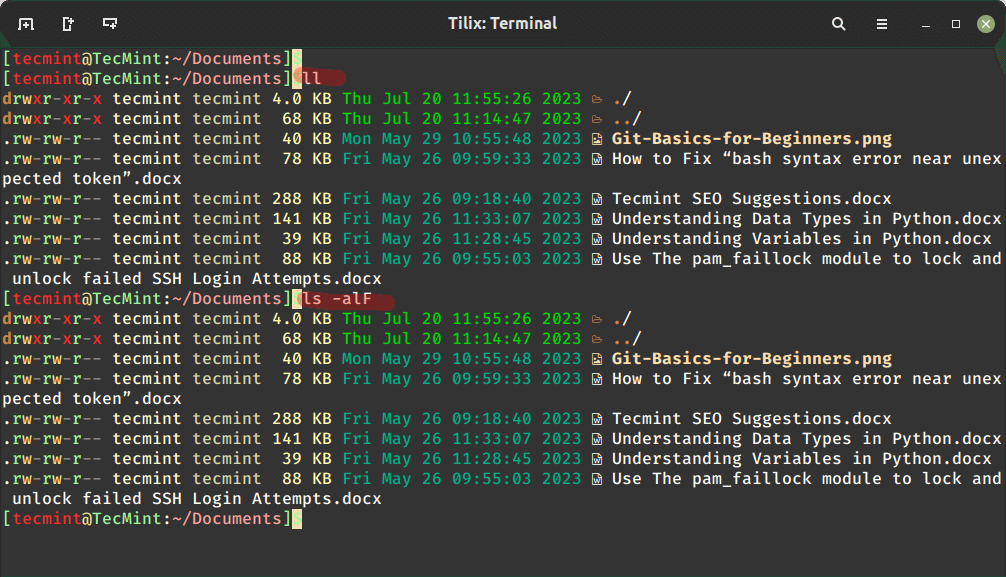
Here you can see the default aliases defined for your user in the Ubuntu system.

As you can see, executing the ll command is equivalent to running ls -alF command.
$ ll
$ ls -alF

You can create an alias with a single character that will be equivalent to a command of your choice.
How to Create Aliases in Linux
Creating aliases is a relatively easy and quick process. You can create two types of aliases – temporary and permanent. We will review both types.
Creating Temporary Aliases in Linux
What you need to do is type the word alias then use the name you wish to use to execute a command followed by "=" sign and quote the command you wish to alias.
The syntax is as follows:
$ alias shortName="your custom command here"
Here is an actual example:
$ alias wr=”cd /var/www/html”
You can then use "wr" shortcut to go to the webroot directory. The problem with that alias is that it will only be available for your current terminal session.
If you open a new terminal session, the alias will no longer be available. If you wish to save your aliases across sessions you will need a permanent alias.
Creating Permanent Aliases in Linux
To keep aliases between sessions, you can save them in your user’s shell configuration profile file. This can be:
- Bash – ~/.bashrc
- ZSH – ~/.zshrc
- Fish – ~/.config/fish/config.fish
The syntax you should use is practically the same as creating a temporary alias. The only difference comes from the fact that you will be saving it in a file this time. So for example, in bash, you can open a .bashrc file with your favorite editor like this:
$ vim ~/.bashrc
Find a place in the file, where you want to keep the aliases. For example, you can add them at the end of the file. For organization purposes, you can leave a comment before your aliases something like this:
#My custom aliases
alias home=”ssh -i ~/.ssh/mykep.pem [email protected]”
alias ll="ls -alF"
Save the file. The file will be automatically loaded in your next session. If you want to use the newly defined alias in the current session, issue the following command:
$ source ~/.bashrc
To remove an alias added via the command line can be unaliased using the unalias command.
$ unalias alias_name
$ unalias -a [remove all alias]
Conclusion
This was a short example of how to create your own alias and execute frequently used commands without having to type each command again and again. Now you can think about the commands you use the most and create shortcuts for them in your shell.


Hey Guys,
If
[ vim ~/.bashrc ]didn’t work use[ nano ~/.bashrc ].Just use gedit text editor…
Why would you, just open window manager and double-click the file?
It was enlightening and simple to get hands-on with confidence. Thank you
I was trying on my MacBook pro but unable to do it, after reading your article it gave me the light of hope and thought of trying for the last time and I did it. Actually, I don’t have admin rights on my lap hence was facing certain issues.
Thanks.
Thanks for your help. I really needed it
Hello, this tutorial was great for me. Thank you for your help.
Awesome, very nice tutorial on how to use alias in the
.bashrcand how to make sure it gets loaded right away.