In computing, Batch processing is the execution of a series of tasks in a program non-interactively. In this guide will offer you 4 simple ways to batch convert several .PNG images to .JPG and vice-versa using Linux command-line tools.
We will use convert command line tool in all the examples, however, you can as well make use of mogrify to achieve this.
The syntax for using convert is:
$ convert input-option input-file output-option output-file
And for mogrify is:
$ mogrify options input-file
Note: With mogrify, the original image file is replaced with the new image file by default, but it is possible to prevent this, by using certain options that you can find in the man page.
Below are the various ways to batch convert your all .PNG images to .JPG format, if you want to convert .JPG to .PNG, you can modify the commands according to your needs.
1. Convert PNG to JPG Using ‘ls’ and ‘xargs’ Commands
The ls command allows you to list all your png images and xargs make it possible to build and execute a convert command from standard input to convert all .png images to .jpg.
----------- Convert PNG to JPG -----------
$ ls -1 *.png | xargs -n 1 bash -c 'convert "$0" "${0%.png}.jpg"'

----------- Convert JPG to PNG -----------
$ ls -1 *.jpg | xargs -n 1 bash -c 'convert "$0" "${0%.jpg}.png"'
Explanation about the options used in the above command.
-1– flag tells ls to list one image per line.-n– specifies the maximum number of arguments, which is 1 for the case.-c– instructs bash to run the given command.${0%.png}.jpg– sets the name of the new converted image, the % sign helps to remove the old file extension.
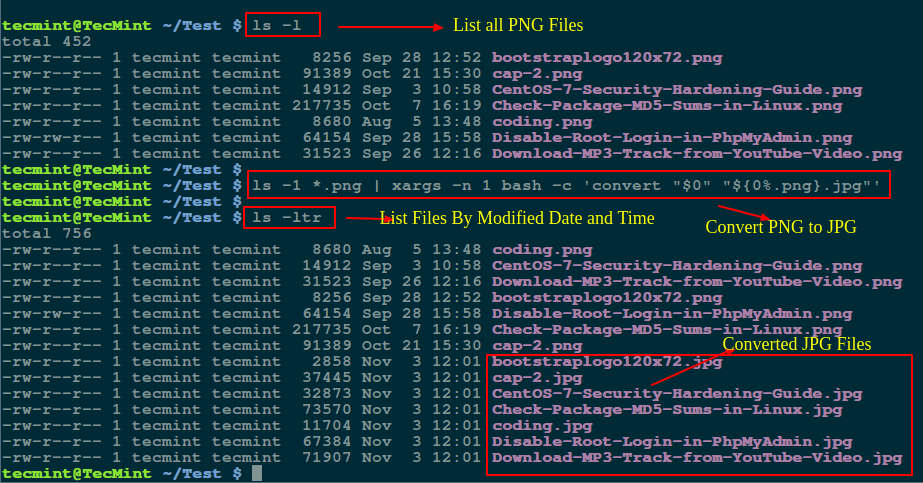
I used ls -ltr command to list all files by modified date and time.
Similarly, you can use above command to convert all your .jpg images to .png by tweaking the above command.
2. Convert PNG to JPG Using GNU ‘Parallel’ Command
GNU Parallel enables a user to build and execute shell commands from standard input in parallel. Make sure you have GNU Parallel installed on your system, otherwise install it using the appropriate commands below:
$ sudo apt-get install parallel     [On Debian/Ubuntu systems]
$ sudo yum install parallel         [On RHEL/CentOS and Fedora]
Once Parallel utility installed, you can run the following command to convert all .png images to .jpg format from the standard input.
----------- Convert PNG to JPG -----------
$ parallel convert '{}' '{.}.jpg' ::: *.png

----------- Convert JPG to PNG -----------
$ parallel convert '{}' '{.}.png' ::: *.jpg
Where,
{}– input line which is a replacement string substituted by a complete line read from the input source.{.}– input line minus extension.:::– specifies input source, that is the command line for the example above where *png or *jpg is the argument.
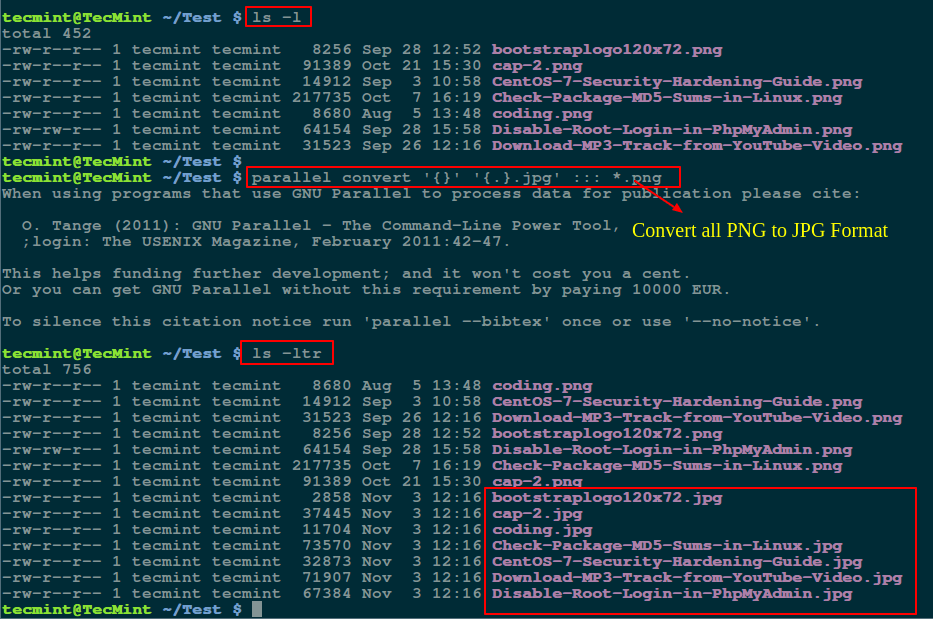
Alternatively, you can as well use ls and parallel commands together to batch convert all your images as shown:
----------- Convert PNG to JPG -----------
$ ls -1 *.png | parallel convert '{}' '{.}.jpg'

----------- Convert JPG to PNG -----------
$ ls -1 *.jpg | parallel convert '{}' '{.}.png'
3. Convert PNG to JPG Using ‘for loop’ Command
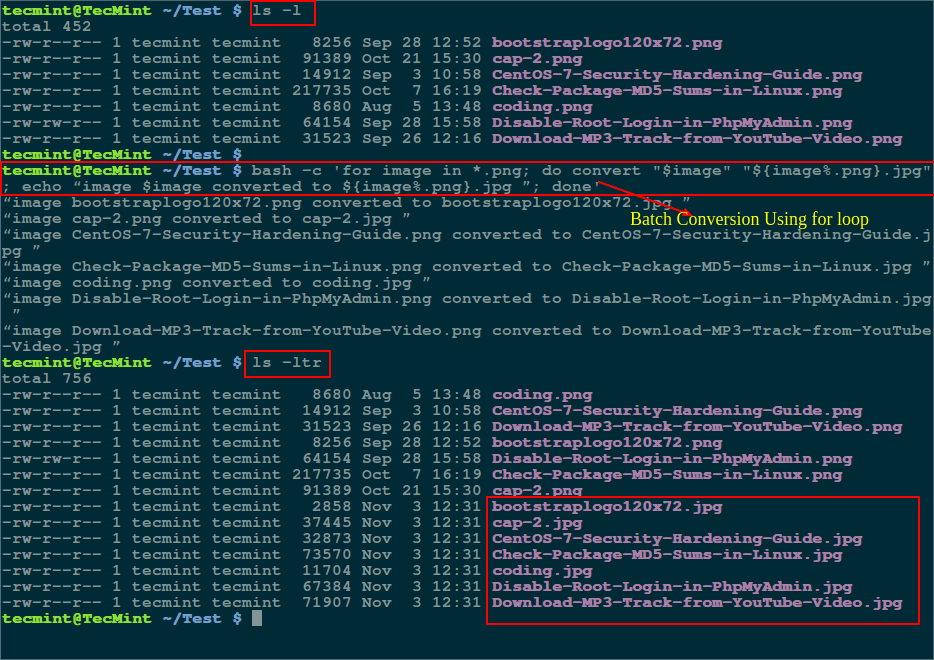
To avoid the hustle of writing a shell script, you can execute a for loop from the command line as follows:
----------- Convert PNG to JPG -----------
$ bash -c 'for image in *.png; do convert "$image" "${image%.png}.jpg"; echo “image $image converted to ${image%.png}.jpg ”; done'

----------- Convert JPG to PNG -----------
$ bash -c 'for image in *.jpg; do convert "$image" "${image%.jpg}.png"; echo “image $image converted to ${image%.jpg}.png ”; done'
Description of each option used in the above command:
- -c allows for execution of the for loop statement in single quotes.
- The image variable is a counter for number of images in the directory.
- For each conversion operation, the echo command informs the user that a png image has been converted to jpg format and vice-versa in the line $image converted to ${image%.png}.jpg”.
- “${image%.png}.jpg” creates the name of the converted image, where % removes the extension of the old image format.
4. Convert PNG to JPG Using Shell Script
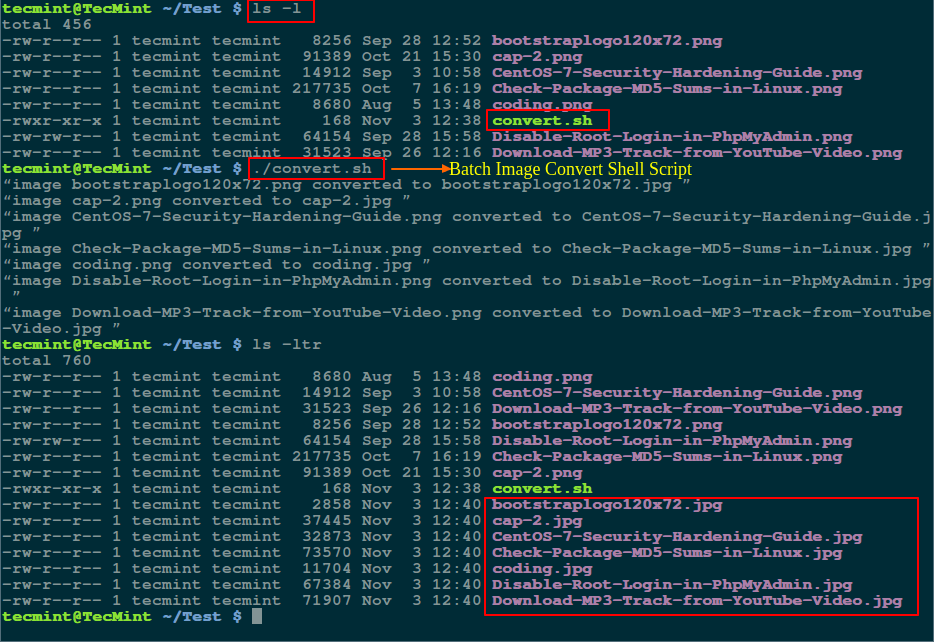
If you do not want to make your command line dirty as in the previous example, write a small script like so:
Note: Appropriately interchange the .png and .jpg extensions as in the example below for conversion from one format to another.
#!/bin/bash
#convert
for image in *.png; do
        convert  "$image"  "${image%.png}.jpg"
        echo “image $image converted to ${image%.png}.jpg ”
done
exit 0
Save it as convert.sh and make the script executable and then run it from within the directory that has your images.
$ chmod +x convert.sh
$ ./convert.sh
In summary, we covered some important ways to batch convert .png images to .jpg format and vice-versa. If you want to optimize images, you can go through our guide that shows how to compress png and jpg images in Linux.
You can as well share with us any other methods including Linux command line tools for converting images from one format to another on the terminal, or ask a question via the comment section below.




Why use bash
-cfor the for loop, and not just invoke a loop directly@Curious
Oh, yes, it should work well. Thanks for sharing this.
Perhaps the commenter’s name (see June 20 at 3:13am) should be moderated.
Since files have existed, certain characters have been forbidden in filenames, depending on the operating system. Spaces used to be universally forbidden. For some time now, forbidden characters have been re-admitted, perhaps as part of a struggle to keep commercial operating systems incompatible with others.
I know it’s off-topic (except that it causes trouble with a solution proposed here), but please could someone point us to an up-to-date review of file naming?
Finally, I may have been too brief when mentioning IrfanView. Its GUI presentation provides many more options than the proposed command-line solutions; for example you can set the maximum output file size and choose the compression of jpeg files.
The article could perhaps have mentioned that good practice is to keep a master png (or tiff) file from which you make lossy jpegs only as required for particular purposes. You may need to start in reverse by making the png from the original jpeg if that is all your camera provides. I do a website where amateur or semi-professional authors present their offerings; despite the rise of digital photography, hardly anybody seems to understand the basic rules and I have to reject many jpegs that have been processed one time too many.
@Christopher
We will check out IrfanView. “Keeping a master png (or tiff) file from which you make lossy jpegs only as required for particular purposes”, is really worth mentioning, which we kind of forgot to point out in the article.
Many thanks for the remarks.
Fails horribly if there are spaces in the filename. garbage.
@U
There is a special way for specifying filenames with spaces in the command line, using the \ character before space in file name. Or else, rename the filenames to remove the spaces.
I made some modifications to the original command to support image files with spaces in them.
All it does is use the “sed” command to replace all spaces with a backslash followed by a space.
$ ls -1 *.jpg | sed 's/ /\\ /g' | xargs -n 1 bash -c 'convert "$0" "${0%.jpg}.png"'It should also be noted that this command does the opposite of what is mentioned in the article. I am converting JPGs to PNGs.
@Greg
Sure, its a much easier way. Thanks for sharing with us.
Using mogrify for batch processing is quite simple:
mogrify -format jpg *.png
This creates new versions of your files in jpg format, while leaving your pngs intact.
I use the brilliant, free and easy IrfanView. The FAQ says:
Q: Can I use IrfanView on Linux?
A: Yes. There is no native-Linux version of IrfanView. However, you can use IrfanView in conjunction with Linux programs like WINE, Windows Linux emulators and Linux-based virtual machines. Take the ZIP version of IrfanView and unzip it or copy your existing Windows IrfanView folder to Linux. This is easier because the installer may need additional Windows DLLs to run. See instructions on: IrfanView on Linux with Wine
@Christopher
That is a great tip, many thanks for sharing it with us and for offering some usage information.