Linux Mint is one of the fastest-growing desktop Linux distributions today. Linux Mint is an Ubuntu-based distribution that aims to be a home user-friendly distribution that has a sleek, clean look as well as provides as much hardware compatibility as possible. All of this is paired with a development team that constantly tries to keep the distribution moving in a forward fashion.
While Linux Mint‘s main releases (LM Cinnamon, LM Mate, and LM Xfce) are based on Ubuntu, there is a lesser-known variant that has been making great strides over the last couple of years. Of course, Linux Mint Debian Edition is the variant and the subject of this tutorial.
Just like the main version of Linux Mint, LMDE is available in the Cinnamon edition only. Currently, LMDE 5 “Elsie” is the latest stable release which is based on the Debian 11 “Bullseye” operating system series.
This means that Linux Mint Debian Edition 5 is driven by the long-term supported Linux 5.10 LTS kernel series, which will be supported till October 2023. On top of that, it comes with all the applications and packages carried in the Linux Mint 20.3 “Una” release.
Installation of Linux Mint Debian Edition 5 “Elsie”
1. The first step to installing LMDE 5, is to obtain the ISO file from Linux Mint’s website. This can be done either through a direct http download or via wget from the command line interface.
This will land on a page where the CPU architecture and desktop environment must be selected. The next screen will prompt the user for a mirror to download the image from or a torrent to use.
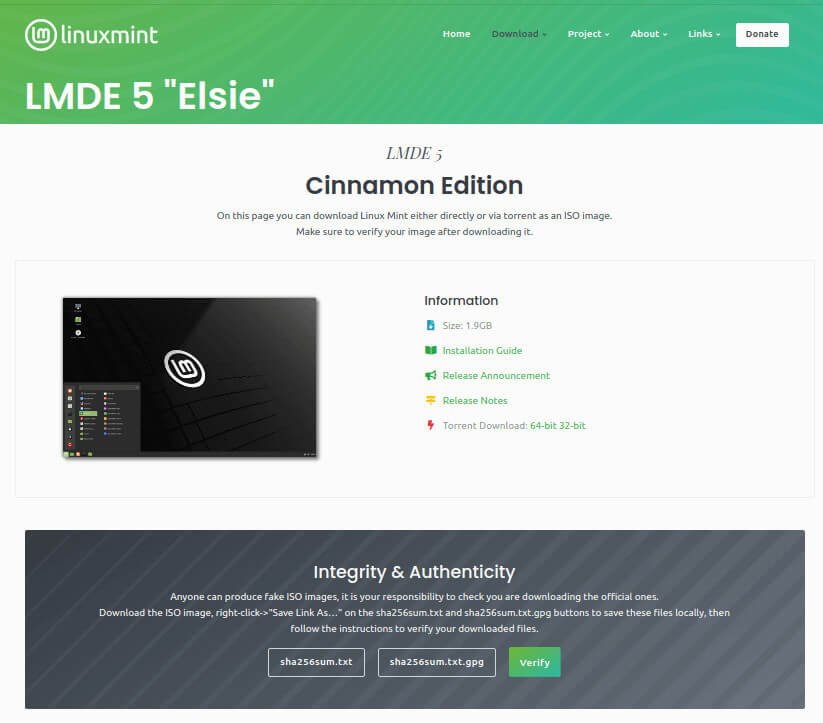
For those who already know that LMDE5 64-bit Cinnamon is for them, feel free to use the following wget command:
# cd ~/Downloads
# wget -c https://mirrors.layeronline.com/linuxmint/debian/lmde-5-cinnamon-64bit.iso
The above commands will switch to the current user’s downloads folder and then proceed to download the iso file from a mirror. For those reading out of the country, please be sure to visit the downloads link in the above paragraph to find a mirror that is close for a quicker download!
2. Once the ISO is downloaded, it will either need to be burned to a DVD or copied onto a USB flash drive. The preferred and easiest method to is do it on a USB flash drive using these useful USB creator tools. The flash drive will need to be at least 4GB in size in order to fit the ISO image and it needs to have all data removed from it.
If you want to create a bootable USB drive via the command line way, go through the following instructions…
WARNING!!! The following steps will render all current data on the USB drive unreadable! Use at your own risk.
3. Now that the disclaimer is out of the way, open a command line window and insert the USB drive into the computer. Once the drive is plugged into the computer, its identifier needs to be determined. This can be accomplished with several different commands and is VERY important to get right. It is suggested that the user do the following:
- Open a command line window.
- Issue the command: lsblk
- Make note of which drive letters already exist (sda, sdb, etc) <– Very important!
- Now plug the USB drive in and reissue: lsblk
- The new drive letter to appear is the device that will need to be used
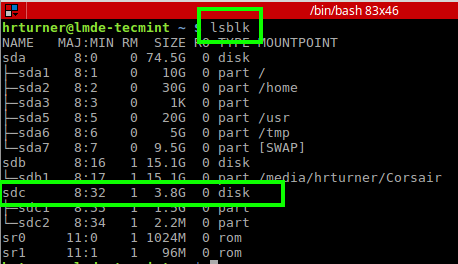
This tutorial /dev/sdc is the device that will be used. This will vary from computer to computer! Be sure to follow the above steps exactly! Now navigate to the downloads folder in the CLI and then a utility is known as ‘dd‘ will be used to copy the ISO image to the USB drive.
WARNING!!! Again, this process will render all data on this USB drive unreadable. Make absolutely sure the data is backed up and the proper drive name has been determined from the steps above. This is the final warning!
# cd ~/Downloads
# dd if=lmde-5-cinnamon-64bit.iso of=/dev/sdc bs=1M
The ‘dd‘ command above will copy the iso file to the flash drive overwriting all data previously on the drive. This process will also make the drive bootable.
The syntax here is very important! This command is run with root privileges and if the input/output is reversed, it will be a very bad day. Triple check the command, source, and destination devices before hitting the enter key!
‘dd‘ will not output anything to the CLI to indicate that it is doing anything but don’t worry. If the USB drive has an LED indicator when data is being written, take a look at it and see if it is flashing very quickly on the device. This is the only indicator that anything will be taking place.
4. Once ‘dd‘ finishes, safely remove the USB drive and place it into the machine that will have LMDE5 installed onto it, and boot the machine to the USB drive. If all goes well, the screen should flash a Linux Mint grub menu and then boot into the screen below!
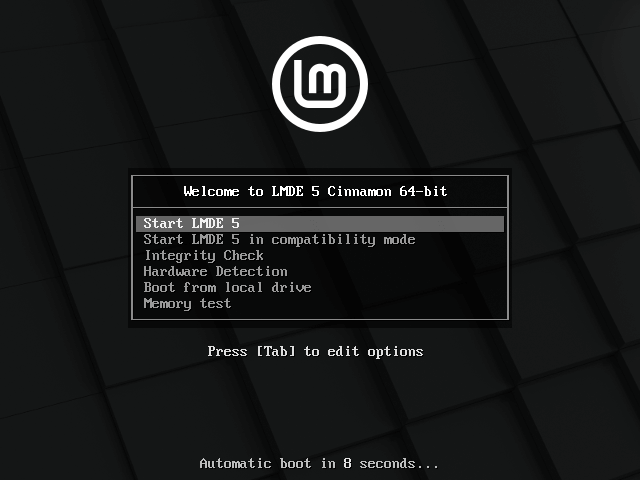
Congratulations a successful bootable LMDE5 USB drive has been created and is now ready to run the installation process. From this screen, click the ‘Install Linux Mint‘ icon on the desktop underneath the ‘home’ folder. This will launch the installer.
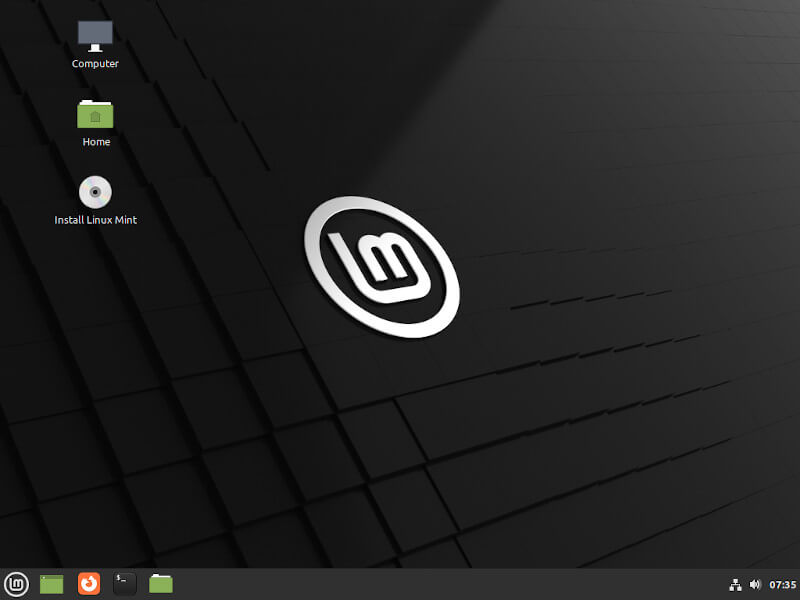
5. The installer doesn’t require it but it is strongly recommended that the computer have AC power connected as well as a connection to the Internet for software packages. The first screen will be the localization screen. Here the language, country, and keyboard layout should all be selected.
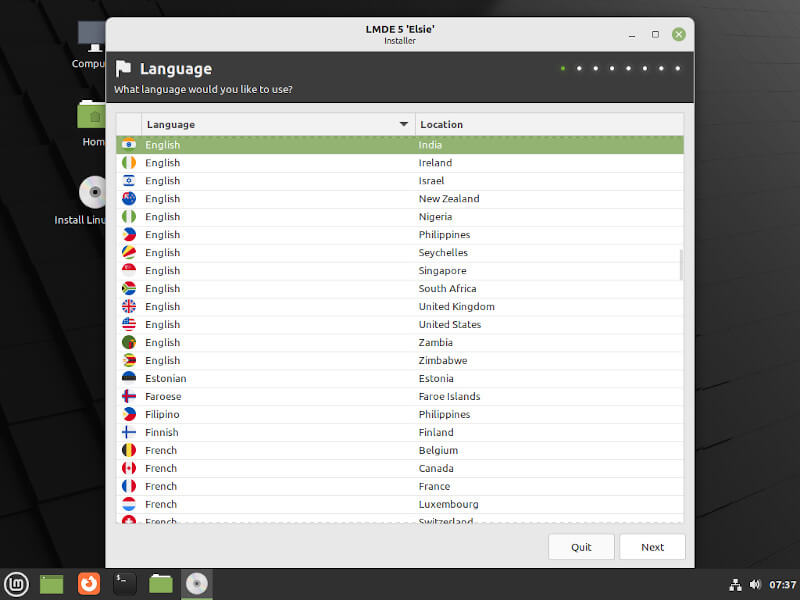
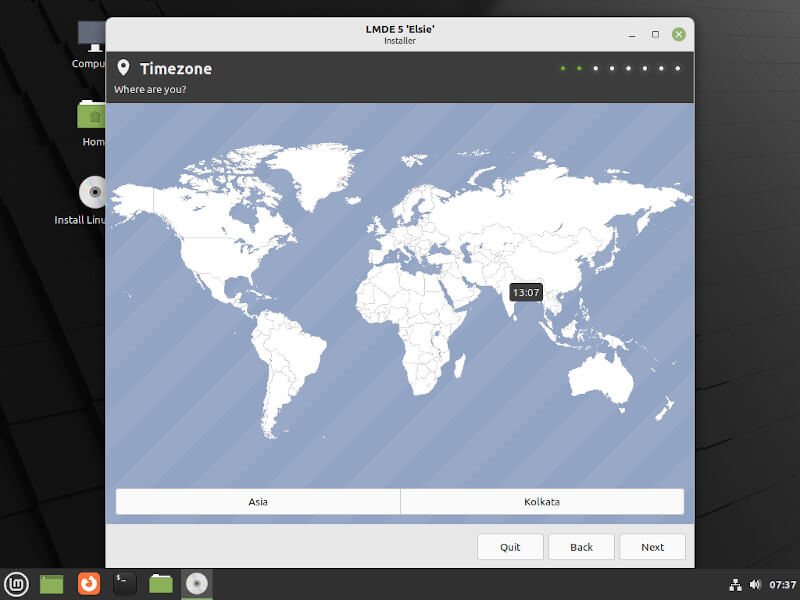
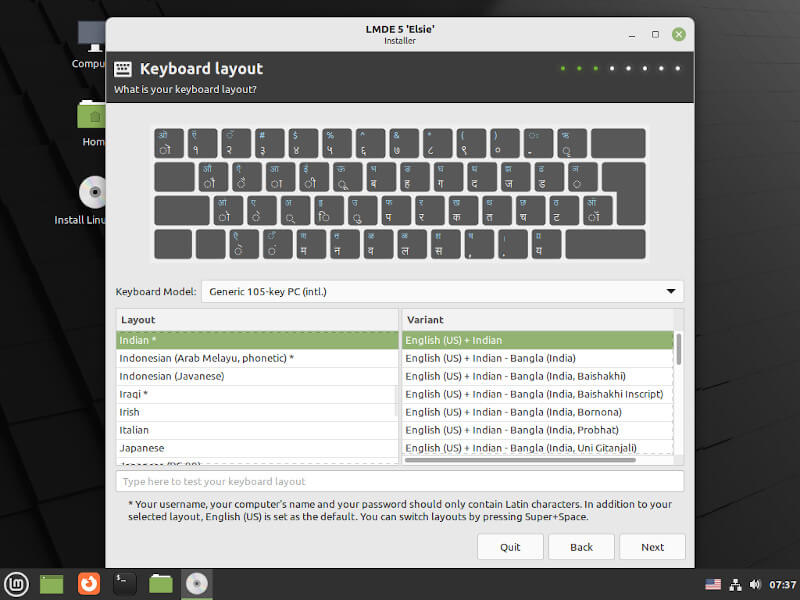
6. The next step is creating a non-root user. Contrary to traditional Debian installs, LMDE will create a non-root user and give them ‘sudo‘ abilities right off the bat.
This may be more familiar to those who have used Ubuntu or normal Linux Mint. Fill in the appropriate user information, make sure the new passwords match and specify any of the other options desired.
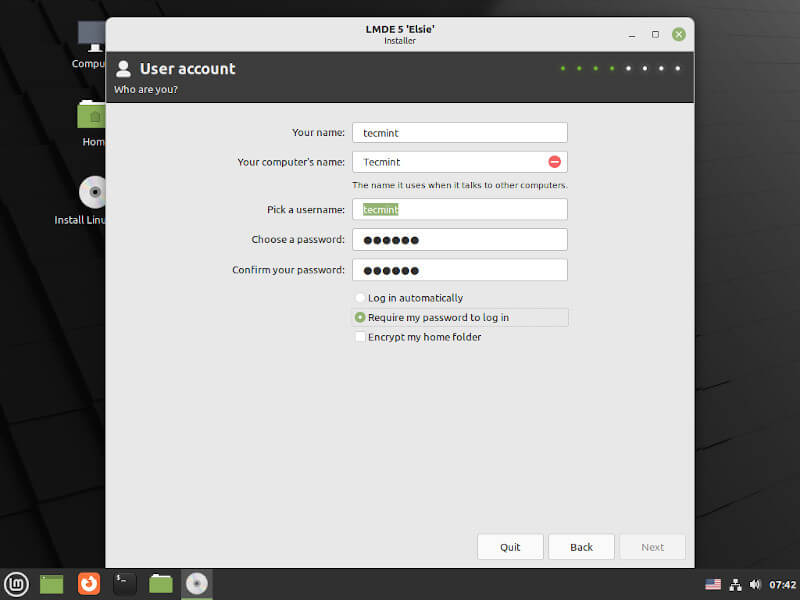
7. The next step is the partitioning process, where you will see two options – Automated Installation and Manual Partitioning.
- Automated Installation – a simple single partition for / (root) is an acceptable practice for most users.
- Manual Partitioning – separate / (root), home, and swap partitions are created by expert users.
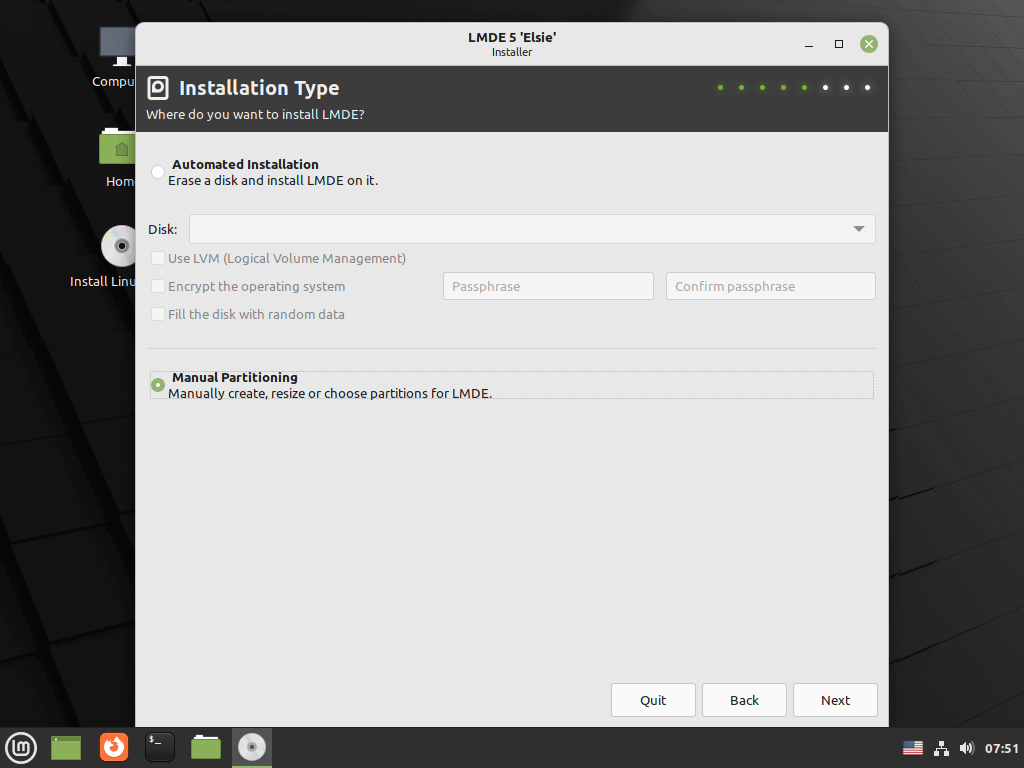
For this install, the following partitioning scheme was used on this laptop using the Manual Partitioning option.
- /root – 20G
- /home – 25G
- swap – 4G
8. To accomplish this task, the installer enables the use of the ‘gparted‘ partition editor by selecting ‘Edit Partitions‘ in the bottom right corner. Unfortunately, this tutorial is lengthy as is and further partitioning is a topic for another article.
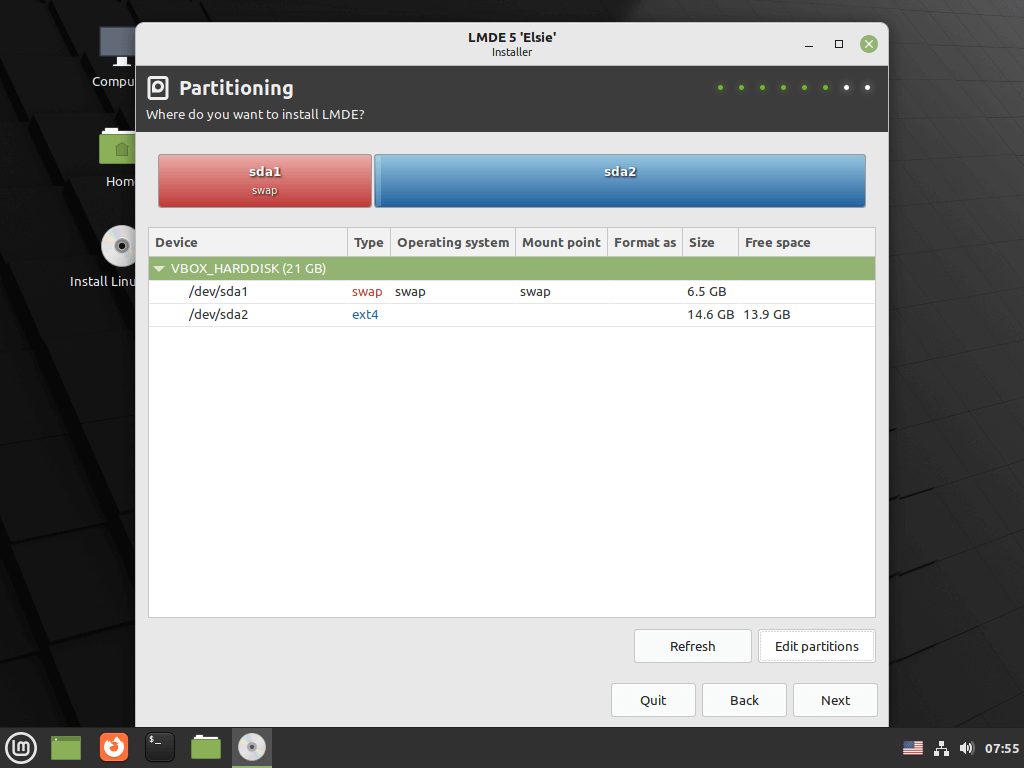
LMDE does expect the user to create partitions and tell the installer the appropriate mount point. Below are the partitions created for this system.
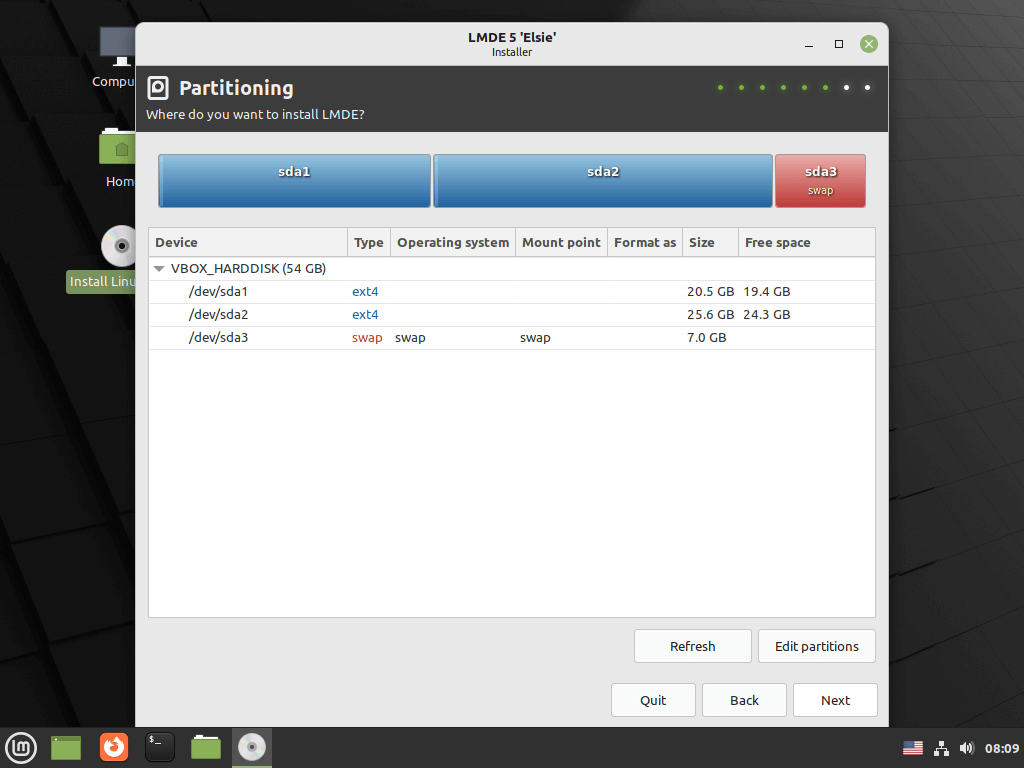
9. Now the installer needs to be told what each partition is to be used for by Linux. Double click on the partition(s) and be sure to select the appropriate mount point.
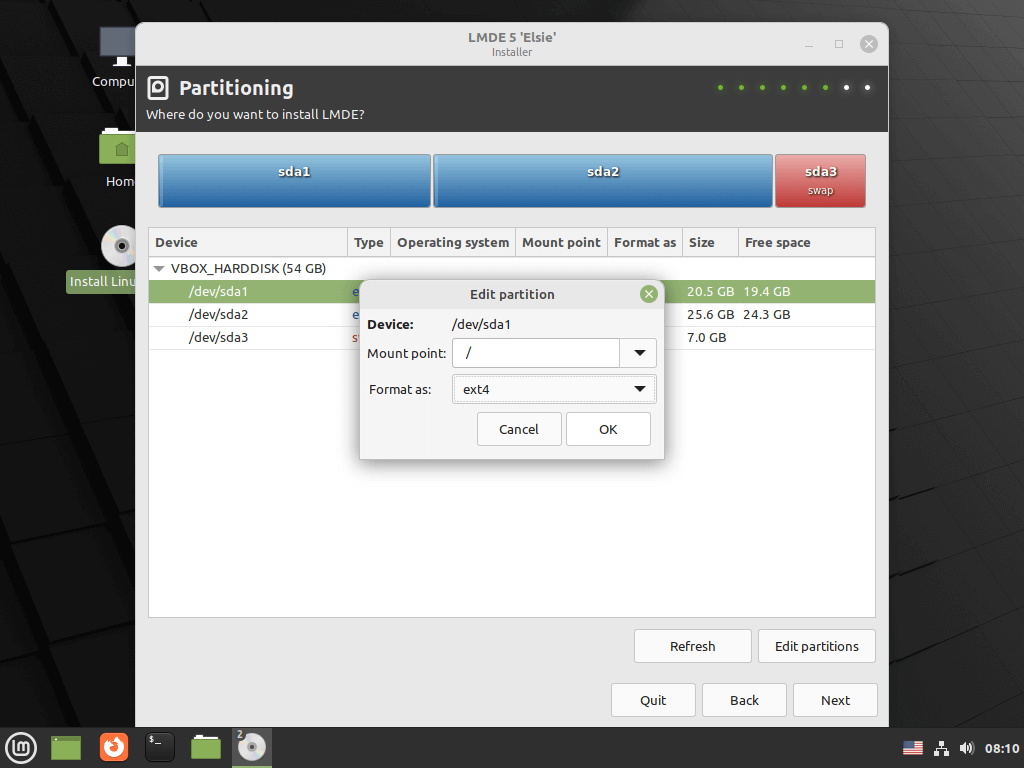
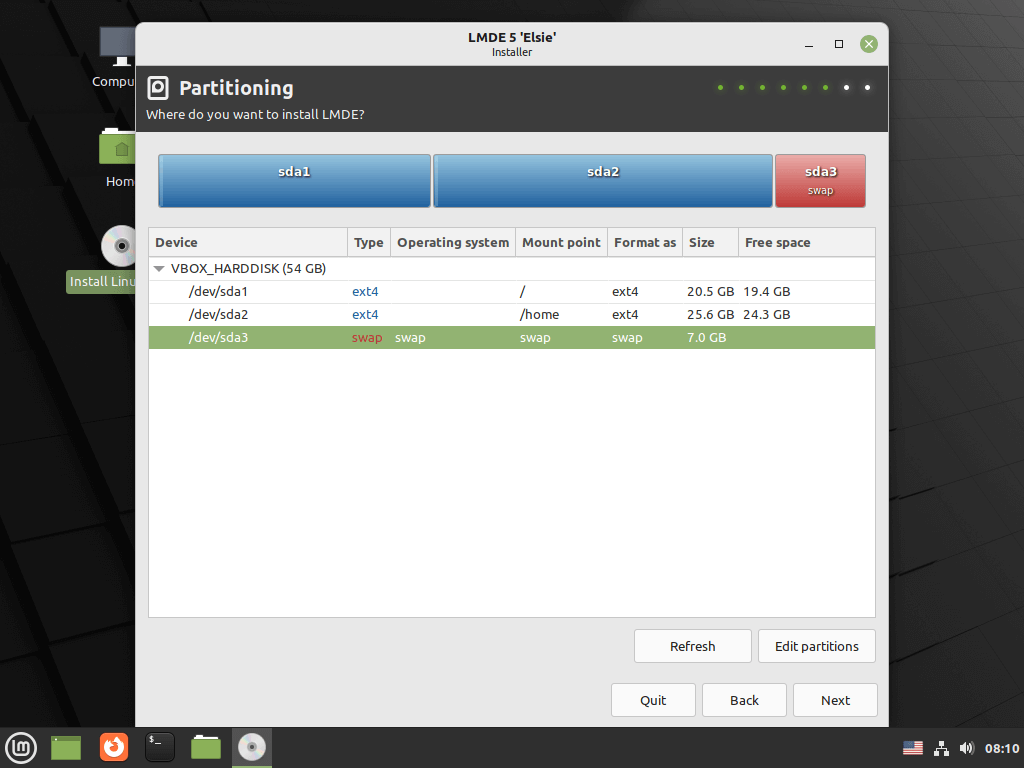
For most home/first-time users, creating one partition and setting it to be / (root) is sufficient. Don’t forget to leave a little bit of hard drive space for swap though!
10. Once the partitioning is completed, the next step will ask where to install GRUB (Grand Unified Bootloader). GRUB is responsible for actually pointing to and loading the Linux kernel when the computer starts and as such is very important! Since this is the only operating system on this computer, grub will be installed to the default location of ‘/dev/sda‘.
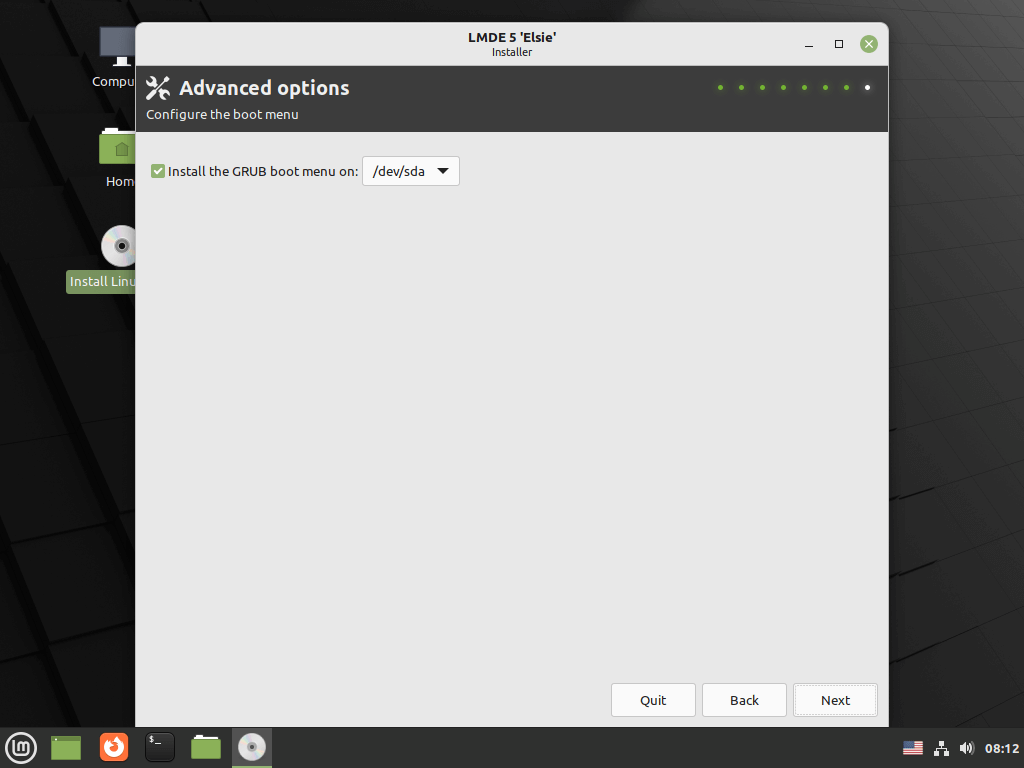
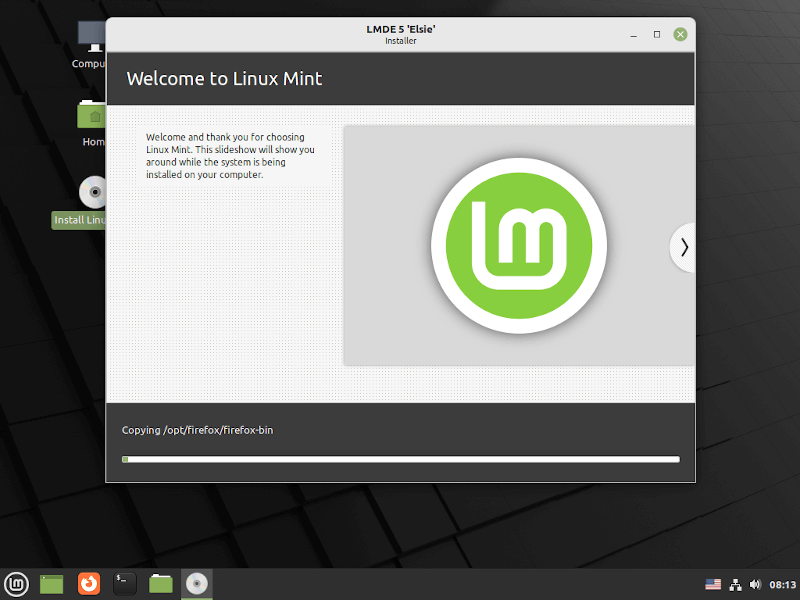
11. After this step, LMDE will begin to the installation process. All in all the process of copying files to the HD from the USB drive took about 10 minutes on this older Toshiba laptop.
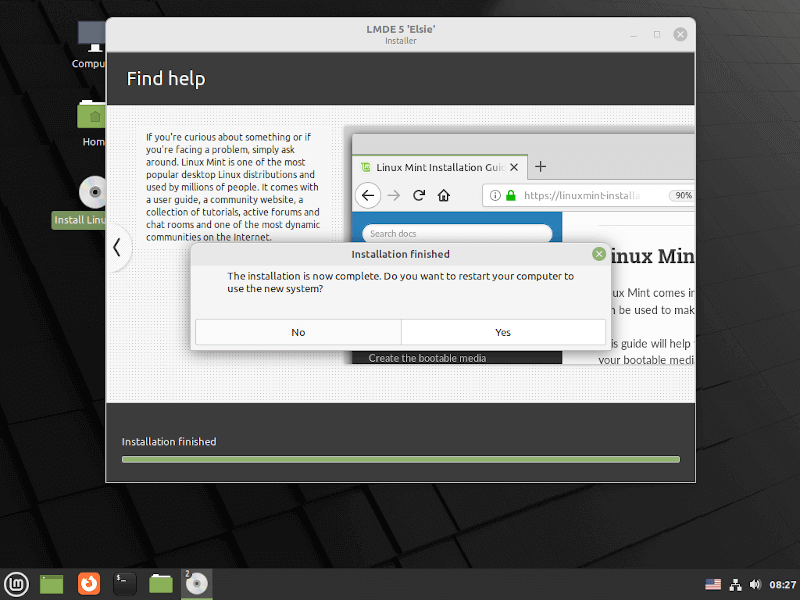
The installer will prompt to restart the system when the installation is complete! Go ahead and restart when the prompt is displayed. Be sure to remove the USB drive as well when prompted so that it won’t boot the USB drive again.
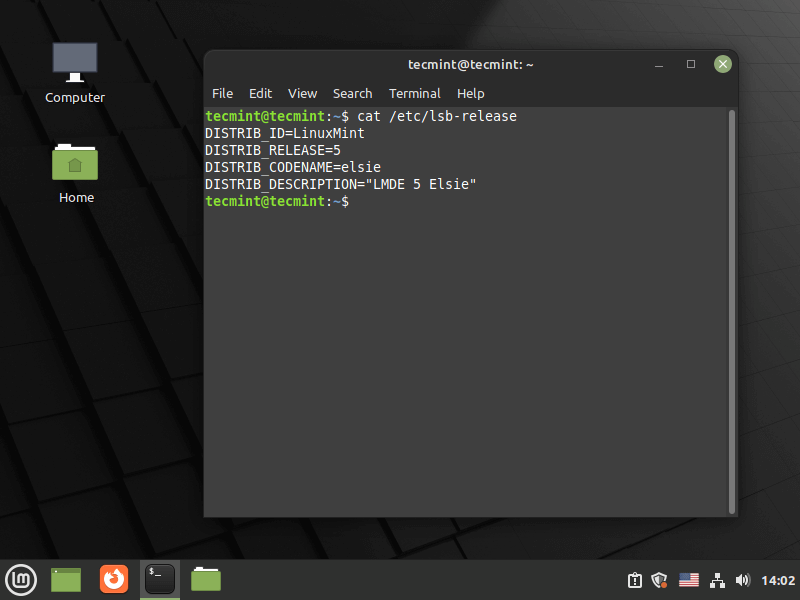
VOILA! LMDE5 Elsie running the cinnamon desktop environment!
Customization Of Linux Mint Debian Edition 5
12. Now that LMDE5 is installed, it is time to start the customization process! This concludes the installation process. The following steps are merely examples of how to do some of the common tasks to make LMDE Cinnamon more user-friendly as well as install some extra utilities.
The first task should always be to check the repositories for anything that may have been added since the ISO image was created. In LMDE, the apt utility can be used to accomplish the task of bringing the system up to date.
$ sudo apt update && sudo apt upgrade
This computer had a few updates to install when the above commands were run which ultimately ended up in gaining some free space on the hard drive!
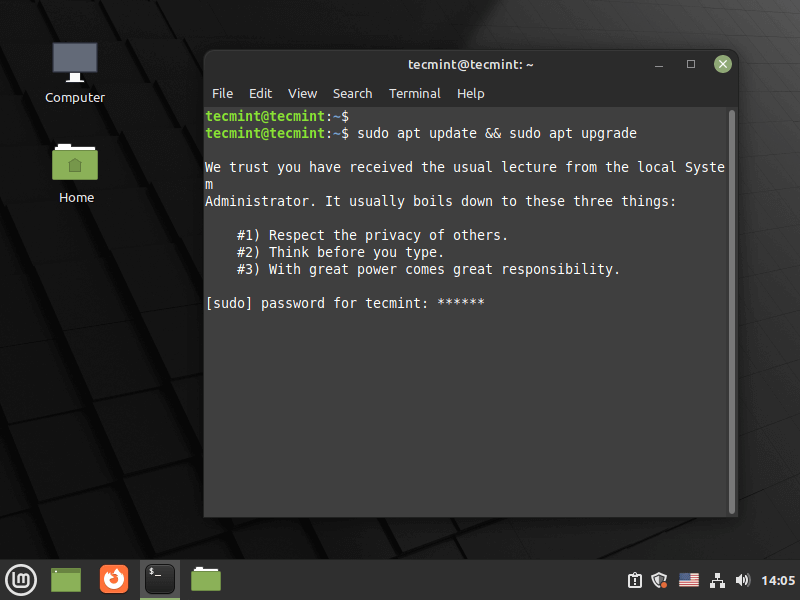
While running these updates, one of the packages (keyboard-configuration) will prompt the user to select a keyboard layout again. Once this process finishes, it’s time to add extra software!
13. The typical (personally preferred) utilities that make the initial install onto fresh systems includes: Terminator, Uncomplicated Firewall, and ClamAV.
Terminator is a shell program that has some useful features like split terminals and multiple profiles. UFW is a utility that makes managing IPTables (the kernel’s built-in firewall) much easier.
Lastly, ClamAV is a free anti-virus utility that can be installed and run in the background similar to most AV systems. The command to install all three is very simple.
$ sudo apt install terminator ufw clamav-daemon
This step should go smoothly. However, there was an issue with ClamAV but it was easy to resolve. The system, after installing the clamav daemon (service), had issues trying to locate the ClamAV virus signatures and then failed to update the signatures with the ‘freshclam‘ utility. The below screenshot should clarify what was experienced.

14. In order to correct this issue and get the AV system to start, issue the following command with Internet access to manually refresh the ClamAV signatures and restart the AV service.
$ sudo freshclam
$ sudo service clamav-daemon restart
To confirm that the ClamAV service has indeed started the ‘ps‘ utility can be used to look for the process.
$ ps ax | grep clamd

The top line in the output confirms that ClamAV is running.
15. The last piece to make LMDE a little more user-friendly is keyboard shortcuts. These are often used to expedite common tasks or launch applications. Creating a keyboard shortcut in LMDE5 is very simple.
First, launch the mint menu by either clicking it with the mouse or pressing the super key (Windows key). Then type the keyboard in the search at the top of the Mint menu.
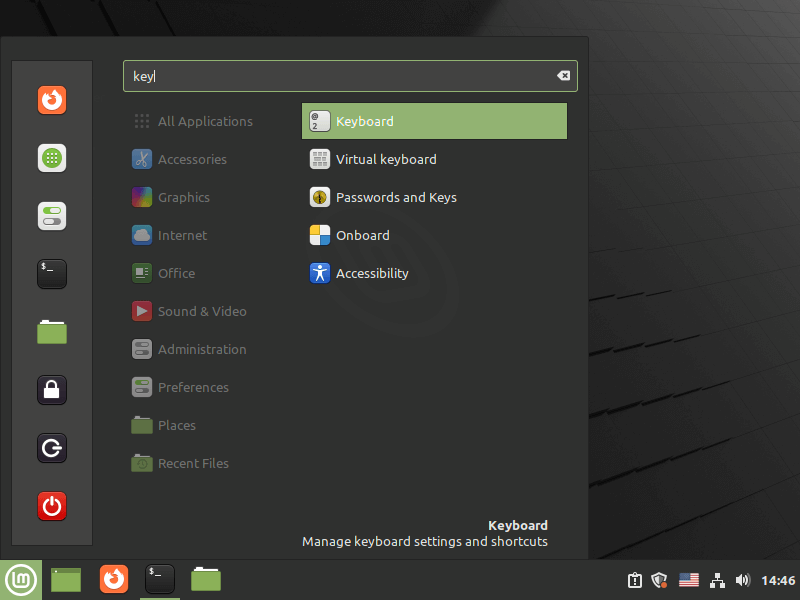
Once the keyboard utility opens, locate the ‘Keyboard Shortcuts‘ tab, select it, then in the column on the left, locate the ‘Custom Shortcuts‘ menu option.
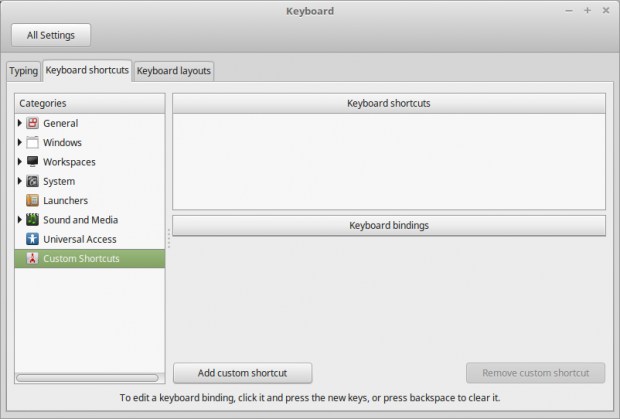
Now clicking the ‘Add Custom Shortcut‘ button will allow for the creation of a custom shortcut. One of the most useful shortcuts to create is for graphical utilities that may need to be launched with root privileges.
There is a useful utility called ‘su-to-root‘ that allows a user to launch a prompt to prompt for their sudo password and then launches the utility with root privileges. Let’s walk through a short example using ‘su-to-root‘ in combination with a utility known as ‘bleachbit‘.
Bleachbit is a system clean-up tool much like Ccleaner in the Windows world. Some of the filters that Bleachbit can be set up on will clean out areas on the system that require root privileges. So without further ado, let’s configure a shortcut to launch ‘Bleachbit‘ using ‘su-to-root‘.
Click the ‘Add Custom Shortcut‘ button. This will create a prompt for the new utility to be launched by the shortcut. Name the shortcut. In this case, it will be called ‘Bleachbit as Root‘. Then in the command field the command ‘su-to-root -X -c bleachbit‘ needs to be typed in.
This is the command that the keyboard shortcut will run when pressed. ‘Su-to-root -X‘ indicates that the system is going to launch an X11 (aka a graphical utility) and then the ‘-c bleachbit‘ indicates that the graphical application that is going to be launched is Bleachbit.
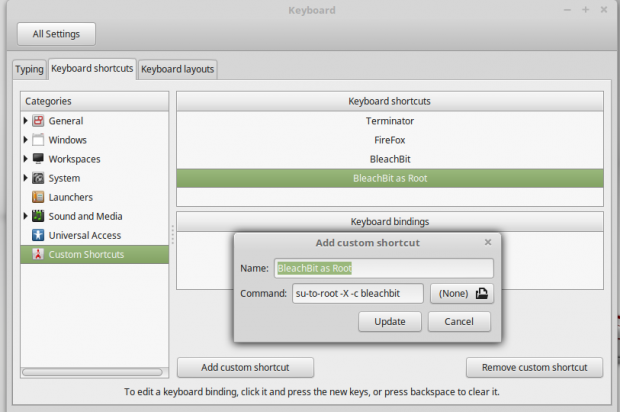
Once the command is typed, click the add button. The new shortcut command should populate the list in the ‘keyboard shortcuts‘ window. Just below that window is the ‘Keyboard Bindings‘ area. Highlight the newly created shortcut and then click on the ‘Unassigned‘ text.
The text will change to ‘Pick an Accelerator‘. This means picking the keyboard shortcut to trigger this command. If something is chosen that is already picked, the system will issue a warning. Once there aren’t any conflicts, the keyboard shortcut is ready for use!
This concludes this installation and minor customization of the new Linux Mint Debian Edition – Elsie. The Linux Mint team has done a wonderful job preparing LMDE for its fifth major release and this new release is sure to please anyone who is willing to try the new distribution!



Hello,
I have difficulty installing LMDE 5 Elsie on my laptop. The window where you choose which language is used is too big for the screen and I can’t click the ‘next’ button. What can I do?
Thank you for the suggestion.
Jan
I am using Linux Mint Cinnamon 20.3 Uma edition. Please tell me how to install LMDE5?
Will my data be removed from the file system partition? Is there any way of installation so that when I upgrade I can save my data?
Please help me ASAP…
This is very useful. But, will you help with SSD installation of LMDE 2? I hear that TRIM enabling and partitioning on UEFI system is a headache?
Prakash,
I haven’t installed LMDE 2 on an SSD as of yet. I have Linux Mint 17.2 on a SSD and trim was enabled by default and has been working flawlessly for several months now. What troubles are you experiencing?
I tried LMDE2 in a VM and decided I’d like to install the Mate version on my laptop. Unlike the new releases of LM17.2, the LMDE bluetooth worked out of the box with both my bluetooth headset and bluetooth speaker. Well the install went smooth and bluetooth works as I hoped. My question is about encrypting my home directory. I didn’t see an option that allows me to encrypt it during install. Is there a way to encrypt it after the fact? or did I miss something during installation?
regards
John
John,
I don’t recall an option to encrypt a home directory without doing an “expert” install. However you can encrypt the directory after installation. To do this, complete the following steps:
1. Log in as another user (I would advise doing this in the CLI). You can’t be logged in as the user who’s home directory you wish to encrypt! I accomplished this by changing the root user’s password using ‘sudo su’ and then passwd once root. Then issuing ‘telinit 1’ from within that terminal you can switch to a runlevel where the other user isn’t logged in.
2. Update the list of available packages: ‘apt-get update’. Then install the necessary packages to encrypt the home directory with ‘apt-get install ecryptfs-utils cryptsetup’. These packages are likely already install but it never hurts to check.
3. Run the command ‘ ecryptfs-migrate-home -u ‘ where is the name of the home directory you wish to encrypt.
4. This should be successful and at this point issue ‘telinit 2’. This will restart the gui and allow you to test that the encrypted directory is readable/writable. DO NOT REBOOT YET!
5. It may be necessary to know/record the encryption pass-phrase. To determine the pass-phrase, log in as the user who’s home directory was just encrypted and issue the following command ‘ecryptfs-unwrap-passphrase’. I would strongly suggest making a note of the output from the command as it is necessary should you ever need to recover your encrypted files manually.
6. (Optional) While optional, it is usually strongly suggested that the system’s swap space be encrypted as well to ensure that plain text files don’t end up stored in swap. To do this simply issue the command ‘sudo ecryptfs-setup-swap’. I received an error on LMDE 2 Mate about not being able to start cryptswap1 when I ran this command, however upon a system restart everything was working as it should.
7. At this point, restart the system and ensure that the user can log into and read/write files in their home directory.
8. If all went well you can now delete the folder in home that will have the username. (eg /home/hrturner.ODT5dgX) as this is the old non-encrypted home directory. This is accomplished by the command ‘ sudo rm -rf /home/hrturner.ODT5dgX ‘
Hope this helps and best of luck!