HTTP/2 is the latest standard for the HTTP protocol, it is the successor of HTTP/1.1. It is becoming increasingly popular due to the benefits it brings to web developers and users in general. It provides an optimized transport for HTTP semantics by supporting all the core features of HTTP/1.1 but aims to be more efficient in multiple ways.
There are a lot of features on top of HTTP/2 that give you more possibilities to optimize a web site/application. It offers true multiplexing and concurrency, better header compression (binary encoding), better prioritization, better flow control mechanisms, and a new interaction mode called “server push” that enables a server to push responses to a client. Not to mention, HTTP/2 is based on Google’s experimental SPDY protocol.
Therefore, the primary focus of HTTP/2 is to reduce overall web page loading time, thus improving performance. It also focuses on network and server resource usage as well as security because, with HTTP/2, SSL/TLS encryption is mandatory.
In this article, you will learn how to enable Nginx with HTTP/2 support in Linux servers.
Prerequisites:
- A working installation of NGINX version 1.9.5 or higher, built with the ngx_http_v2_module module.
- Make sure that your site uses SSL/TLS certificate, if you don’t have one, you can obtain from Let’s Encrypt or use a self-signed certificate.
You can install NGINX or deploy it with a LEMP stack as described in the following guides:
- How to Install Nginx on CentOS 8
- How To Install LEMP Server on CentOS 8
- How To Install NGINX, MySQL/MariaDB and PHP on RHEL 8
- How to Install LEMP Stack with PhpMyAdmin in Ubuntu 20.04
- Install Nginx with Server Blocks (Virtual Hosts) on Debian 10
- How to Use Nginx as an HTTP Load Balancer in Linux
How to Enable HTTP/2.0 in NGINX
If you have NGINX installed, verify that it was built with the ngx_http_v2_module module by running the following command.
# strings /usr/sbin/nginx | grep _module | grep -v configure| sort | grep ngx_http_v2_module

Once you have a web site/application being served by NGINX with HTTPS configured, open your websites virtual server block (or virtual host) file for editing.
# vi /etc/nginx/conf.d/example.com.conf                    [On CentOS/RHEL]
$ sudo nano /etc/nginx/sites-available/example.com.conf    [On Ubuntu/Debian]
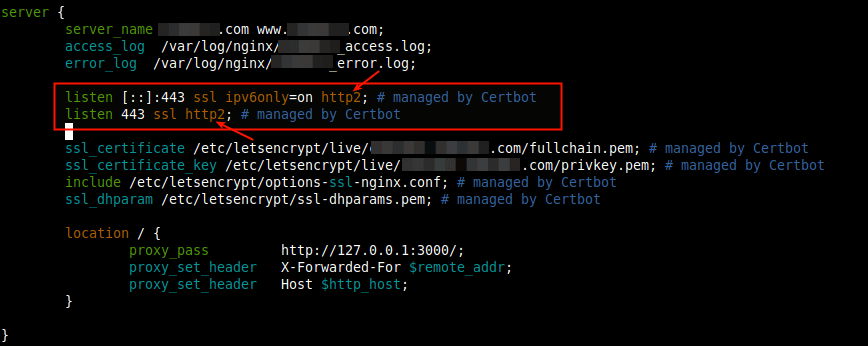
You can enable HTTP/2 support by simply adding the http2 parameter to all listen directives as shown in the following screenshot.
listen 443 ssl http2;
The sample server block configuration looks like below.
server {
        server_name example.com www.example.com;
        access_log  /var/log/nginx/example.com_access.log;
        error_log  /var/log/nginx/example.com_error.log;

        listen [::]:443 ssl ipv6only=on http2; # managed by Certbot
        listen 443 ssl http2; # managed by Certbot

        ssl_certificate /etc/letsencrypt/live/example.com/fullchain.pem; # managed by Certbot
        ssl_certificate_key /etc/letsencrypt/live/example.com/privkey.pem; # managed by Certbot
        include /etc/letsencrypt/options-ssl-nginx.conf; # managed by Certbot
        ssl_dhparam /etc/letsencrypt/ssl-dhparams.pem; # managed by Certbot
}

Save the changes in the file and close it.
Then check the NGINX’s configuration syntax, if it’s OK, restart the Nginx service.
# nginx -t
# systemctl restart nginx
Next, open a web browser to verify if your website is being served over HTTP/2.
http://www.example.com
To access the HTTP headers, right-click on the displayed web page, select Inspect from the list of options to open the developer tools, then click the Network tab, and reload the page.
Check under Protocols to see the one your site is using (if you don’t see the Protocols header, right-click on any of the headers e.g Name, then check Protocol from the list to display it as a header).
If your site is running on HTTP/1.1, under Protocol, you will see http/1.1 as shown in the following screenshot.

If it is running on HTTP/2, under Protocol, you will see h2 as shown in the following screenshot. You may want to disable the browser cache to view the latest content being served directly from the webserver.

That’s all! For more information, see the ngx_http_v2_module module documentation. Do not hesitate to ask questions via the feedback form below.


