The Linux ecosystem provides numerous ways of configuring networking including the popular Network Manager daemon and command-line tools such as nmcli and nmtui GUI utility. This guide introduces yet another network configuration tool known as NMState
NMState is a declarative network manager for configuring networking on Linux hosts. It’s a library that provides a command-line tool that manages host network settings. It manages host networking through a northbound declarative API. At the time of writing this guide, the NetworkManager daemon is the only provider supported by NMState.
In this guide, we look at some of the example usages of the NMState tool. For this guide, we will demonstrate this using Fedora Linux.
Imperative vs Declarative Approaches
Network management can take two approaches – Imperative and declarative. In the imperative approach, you explicitly define the networking state of an interface by running commands on the terminal. The focus is on the ‘how’.
For example, to bring down a network using the imperative approach, run the command:
$ sudo ifconfig enp0s3 down
On the other hand, the declarative approach uses a YAML file to apply the changes to a configuration. Most DevOps orchestration tools such as Kubernetes use this approach to deploy pods applications using a YAML file.
This approach provides what is commonly referred to as Infrastructure as Code (IaC) in DevOps circles. This enhances the automation of network configuration on the host and provides a fast and more reliable way of making multiple changes to a network interface with minimal errors.
Now, let us switch gears and see how you can use the NMState configuration tool to configure your network interfaces in Linux.
Step 1: Install NMState Networking Config Tool
We will get the ball rolling by installing the Nmstate. First, check the availability of the package from Fedora repositories as follows:
$ sudo dnf search nmstate
From the output, we can see that the network manager is available on the official repositories.

Next, install NMstate as follows. This works on Fedora 31 and later versions.
$ sudo dnf install nmstate
The command installs the NMState network manager API alongside other Python dependencies.
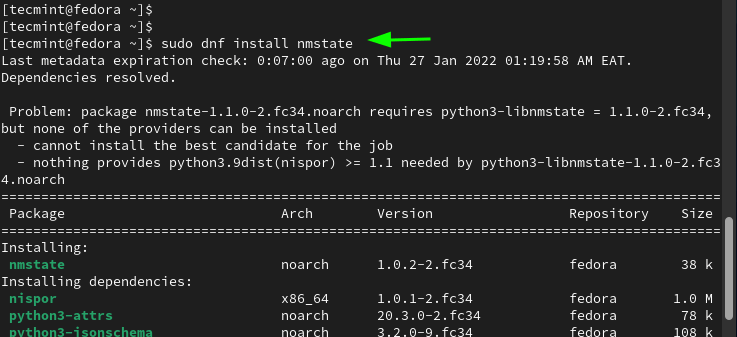
Once the installation is complete, verify the nmstate package is installed as follows.
$ rpm -qi nmstate
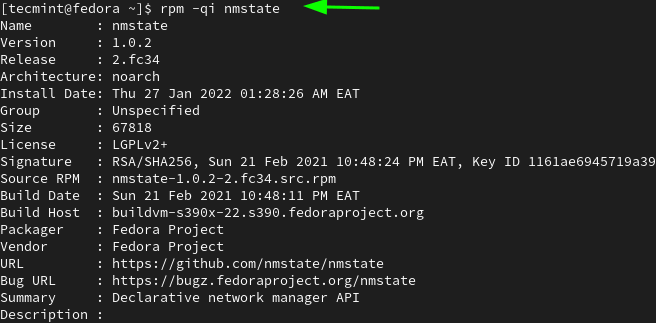
For RHEL-based Linux, enable the copr repository first.
$ sudo dnf copr enable nmstate/nmstate-stable
Then install NMstate as follows.
$ sudo dnf install nmstate
Check out additional instructions on how to install NMState from the source.
Once installed, you can check the version of NMstate installed as follows.
$ nmstatectl version

1.0.2
Using NMState Configuration Tool in Linux
With NMstate installed, let us get down to the Knitty-gritties of how you can make the most of the Network manager API.
To view the current network configuration of your network interface, run the following command. Here, is the configuration of your enp0s3 interface.
$ nmstatectl show enp0s3
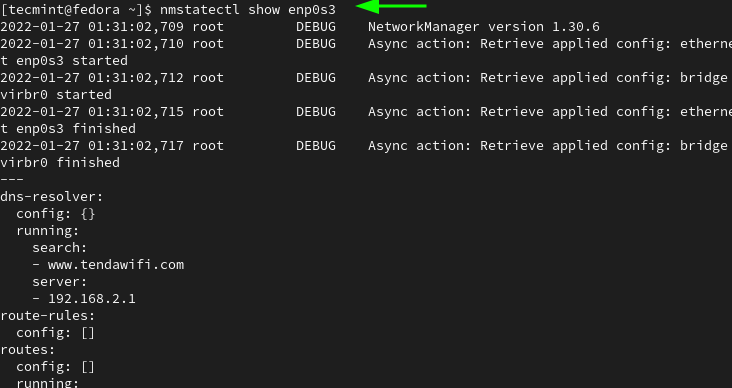
The output is divided into 4 distinct sections:
- dns-resolver: This section contains the nameserver configuration for the particular interface.
- route-rules: This stipulates the routing rules.
- routes: This includes both dynamic and static routes.
- Interfaces: This section specifies both the ipv4 and ipv6 settings.
Changing Network Configuration in Linux
You can use the NMState configuration tool to configure your hosts to the desired state using either interactive or file-based modes.
- Interactive: This edits a network interface using the nmstatectl edit command. This command opens a text editor which is defined by the EDITOR environment variable. Once the changes are saved, NMState applies the new configuration immediately unless syntax errors were detected.
- File-based: In file-based mode, the interface configuration is applied using a YAML or JSON file using the nmstatectl apply command.
Let us now get our hands dirty and check out how you can modify network configuration using NMState.
Our Fedora system has two active network interfaces with the following configuration:
$ ip -br -4 a
Sample Output
lo               UNKNOWN        127.0.0.1/8
enp0s3           UP             192.168.2.104/24
enp0s8           UP             192.168.2.103/24
Interactive Configuration Mode Example
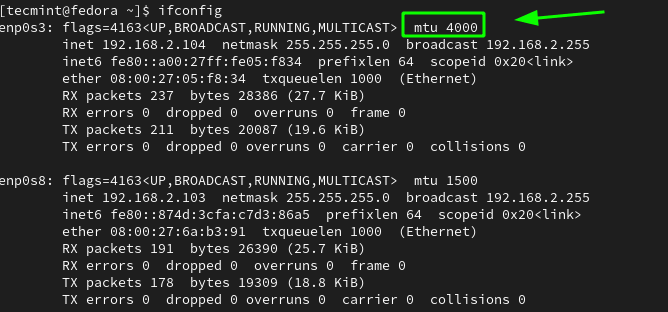
We will use interactive mode to change the MTU (Maximum Transmission Unit) of the enp0s3 network interface. By default, this is set to 1500 as shown.
$ ifconfig
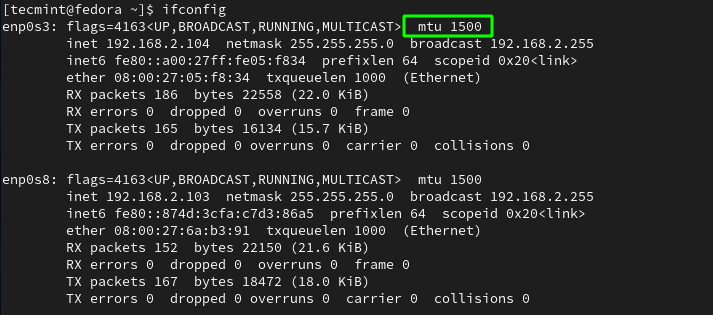
We will change this to 4000. We will do so using the nmstatectl edit command as follows.
$ sudo nmstatectl edit enp0s3
This opens the configuration in a text editor. For our case, it opens in vim editor. Next, scroll all the way down and locate the mtu parameter. We will change the value to 4000, just as we would edit a file in vim. Then we will save the changes.
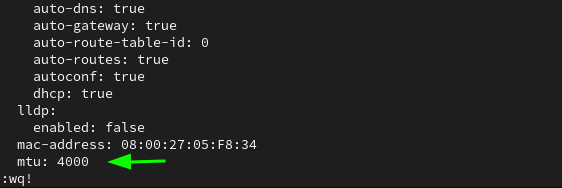
When you save and exit the file, you will see some scrambled output on the terminal as NMstate saves the changes. No intervention is required so, just sit still.
Let us now confirm that the change was made.
$ ifconfig
From the terminal output, we can see that we have successfully changed the MTU to 4000 from the default 1500 value.
File-based Configuration Mode Example
Let us now modify the configuration using file-based mode. In this example, we are going to disable IPv6 for the enp0s8 network interface. The first step is to create a YAML file that will specify the desired state of the enp0s8 network interface.
$ sudo nmstatectl show enp0s8 > enp0s8.yml
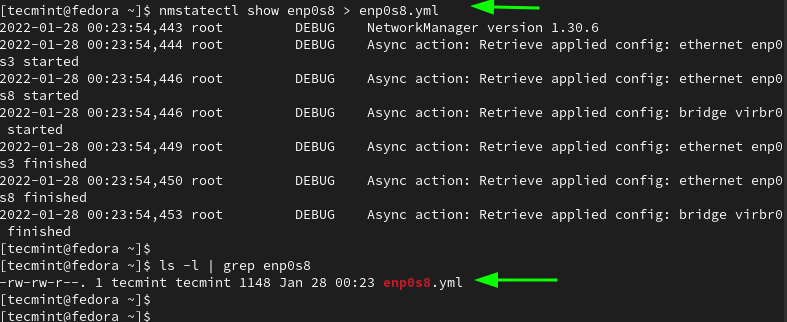
Next, we will edit the YAML file as follows.
$ sudo vim enp0s8.yml
Scroll down to the ipv6 section. To disable IPv6, set the enabled parameter to false and delete the lines that have been struck through.
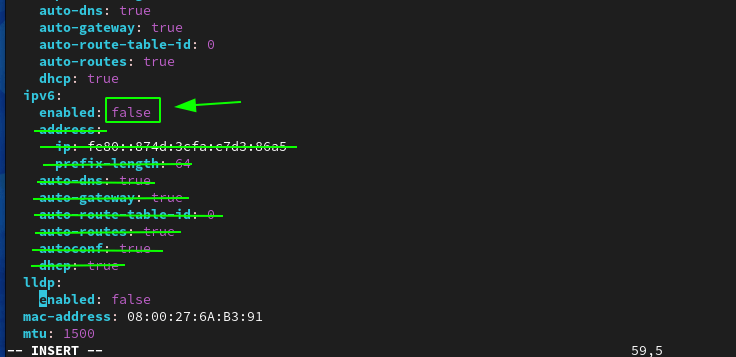
Save the configuration and apply the new state using the YAML file as follows.
$ sudo nmstatectl apply enp0s8.yml
Now run the command shown to verify that IPv6 has been disabled. The output displayed shows that the IPv6 for the enp0s8 network interface is blank, implying that we have successfully disabled IPv6 on the interface.
$ ip -br a

Applying Network Changes Temporarily
Another really handy functionality that NMstate provides is the ability to temporarily configure a desired networking state. Once you are satisfied with the configuration, you can proceed and make the changes permanent. Otherwise, the changes made will roll back to the initial settings once the timeout expires. The default timeout is 60 seconds.
To demonstrate this, we will temporarily set a static IP on the enp0s3 interface and disable DHCP. Once again, access the file using a text editor.
$ sudo vim enp0s3.yml
Scroll to the ipv4 section. Specify the static IP – in our case 192.168.2.150 and delete the lines that have been struck-through. In addition, be sure to set the dhcp parameter to false.
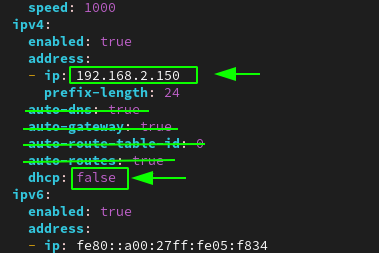
Save the file and temporarily commit the changes as follows.
$ sudo nmstatectl apply --no-commit --timeout 20 enp0s3.yml
The --no-commit option temporarily applies the changes for a period defined by the --timeout option which, in this example, is 20 seconds.
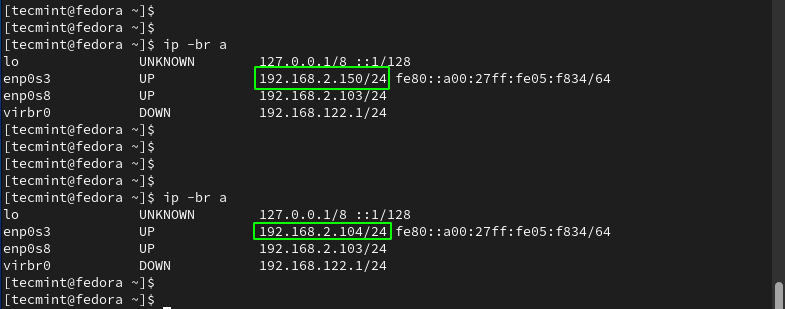
To verify the temporal application of the changes, we will check the IP configuration in a time interval of 20 seconds.
$ ip -br a
From the output, you can see that the interface IP configuration reverted to DHCP after the time interval of 20 seconds. The IP address went back to 192.168.2.104 from the earlier statically configured IP which was 192.168.2.150.
Admittedly, the NMState tool is a convenient tool for configuring your network interfaces. It is a declarative tool that applies the desired configuration state of a host’s interface using the NetworkManager API.
The state is easily defined using either the interactive approach or using the file-based method that uses a pre-configured YAML file. This enhances the automation of configuration tasks and reduction of errors during configuration.


