Skype is a hugely popular telecommunications application that enables people from around to get connected in a simple and convenient way. With Skype, you can easily connect and stay in touch with your family, friends, and colleagues from around the world.
The application can run on a myriad of devices such as Android and iOS, PC, tablet, and Mac. You can send instant messages, share files, and even make clear audio and HD video calls to other users on Skype.
At a glance, Skype provides the following set of features:
- Audio and HD video calling (Clear audio calls and HD video calls in one-to-one and even groups calls).
- Smart messaging (with emojis, reactions to messages, and @ mentions to grab a recipient’s attention).
- Screen sharing (you can share your Desktop thanks to integrated screen sharing).
- Phone calls (with pocket-friendly international calling rates).
Thanks to its rich set of features, Skype comes very much in handy in holding online meetings and conducting job interviews where geographical location is a hindrance.
[ You might also like: 11 Best Tools to Access Remote Linux Desktop ]
In this article, we walk you through the installation of Skype on Rocky Linux / AlmaLinux.
Step 1: Enable Skype Repository on Rocky / AlmaLinux
The first step is to add the Skype repository to your system. But first off, upgrade your packages and refresh the repositories using the dnf command as shown.
$ sudo dnf update
Next, enable add the repository to your Rocky Linux / AlmaLinux system by running the following command.
$ sudo dnf config-manager --add-repo https://repo.skype.com/rpm/stable/skype-stable.repo
Right after running the command, you should get a confirmation that the Skype repository was added.

Just to confirm that the repository was added, run the command:
$ sudo dnf repolist | grep -i Skype

Great! With the Skype, repository added, head over to the next step to install Skype.
Step 2: Install Skype on Rocky / AlmaLinux
To install Skype, simply run the command:
$ sudo dnf install skypeforlinux
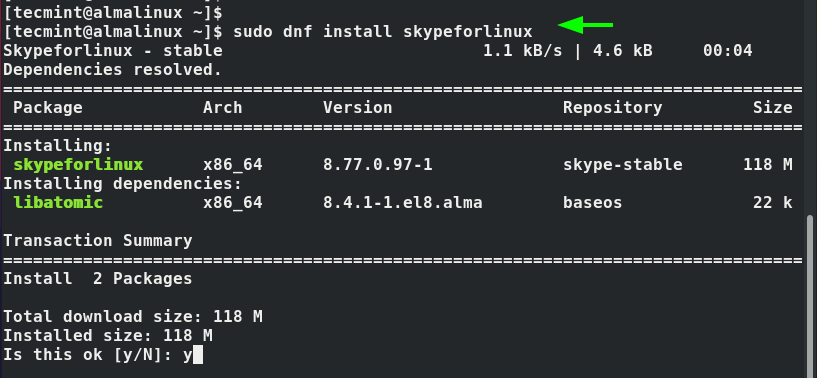
To confirm that Skype was successfully installed run the rpm command:
$ rpm -qi skypeforlinux
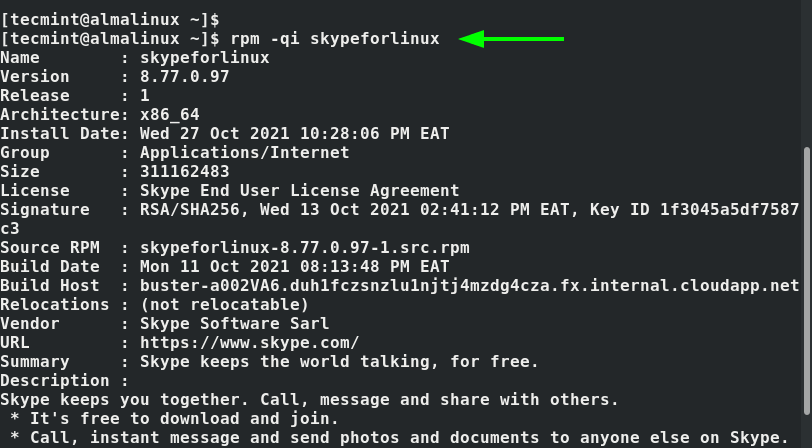
Skype is now successfully installed. Let’s now Launch it.
Step 3: Launch Skype on Rocky / AlmaLinux
To launch Skype, click on ‘Activities‘ at the top left corner and search for it as demonstrated.

Click on the Skype icon to launch it. On the pop-up GUI, click on ‘Let’s go’ to move to the next step.

Thereafter, click on the ‘Sign in or Create‘ button which takes you to the next step where you will be required to either sign in with your Microsoft account or create a new account.

Next, you will be ushered to the Skype dashboard where you can find all your contacts and previous chats in place. You can now connect and stay in touch with your family and friends from the comfort of your device.
And this wraps up our guide. We have walked you through the installation of Skype on Rocky Linux / AlmaLinux.

