We always need to check the speed of the Internet connection at home and office. What do we do about this? Go to websites like Speedtest.net and begin the test. It loads JavaScript in the web browser and then selects the best server based upon ping and outputs the result. It also uses a Flash player to produce graphical results.
[ You might also like: Fast – Test Your Internet Download Speed from Linux Terminal ]
What about a headless server, where isn’t any web-based browser and the main point is, most of the servers are headless. Another bottleneck of such web browser-based speed testing is that you can’t schedule the speed testing at regular intervals.
Here comes an application “Speedtest-cli” that removes such bottlenecks and lets you test the speed of Internet connection from the command line.
What is Speedtest-cli
The application is basically a script developed in the Python programming language. It measures Internet Bandwidth speed bidirectionally. It uses speedtest.net infrastructure to measure the speed. Speedtest-cli is able to list servers based upon physical distance, test against the specific servers, and gives you a URL to share the result of your internet speed test.
To install the latest speedtest-cli tool in Linux systems, you must have Python 2.4-3.4 or a higher version installed on the system.
[ You might also like: How to Install Latest Python 3.6 Version in Linux ]
Install speedtest-cli in Linux
There are three ways to install the speedtest-cli tool. The first method involves the use of python-pip package while the second method is to download the Python script, make it executable and run it and the third method is to use the package manager. Here I will cover all ways…
On this page
Let’s get started…
Install speedtest-cli Using Python PIP
First, you need to install the python-pip package, then afterward you can install the speedtest-cli tool using the pip command as shown below.
Install PIP in Debian/Ubuntu/Mint
$ sudo apt install python-pip                [Python 2]
$ sudo apt install python3-venv python3-pip  [Python 3]
Install PIP in CentOS/RHEL
$ sudo yum install epel-release
$ sudo install python-pip
Install PIP in Fedora
$ sudo yum upgrade python-setuptools
$ sudo yum install python-pip python-wheel  [Python 2]
$ sudo dnf install python3 python3-wheel    [Python 3]
Install PIP in openSUSE
$ sudo zypper install python-pip python-setuptools python-wheel    [Python 2]
$ sudo zypper install python3-pip python3-setuptools python3-wheel [Python 3]
Install PIP in Arch Linux
$ sudo pacman -S python2-pip     [Python 2]
$ sudo pacman -S python-pip      [Python 3]
Once pip has been installed, you can install the speedtest-cli tool.
$ sudo pip install speedtest-cli
OR
$ sudo pip3 install speedtest-cli
To upgrade speedtest-cli, at a later stage, use.
$ sudo pip install speedtest-cli --upgrade
Install speedtest-cli Using Python Script
First, download the python script from Github using the wget command or curl command and make the script file executable.
$ wget -O speedtest-cli https://raw.githubusercontent.com/sivel/speedtest-cli/master/speedtest.py
$ chmod +x speedtest-cli

OR

$ curl -Lo speedtest-cli https://raw.githubusercontent.com/sivel/speedtest-cli/master/speedtest.py
$ chmod +x speedtest-cli
Next, move the executable to /usr/bin folder, so that you don’t need to type the full path every time.
$ sudo mv speedtest-cli /usr/bin/
Install speedtest-cli Using Package Manager
You can also install speedtest-cli using your default package manager as shown.
------ On Ubuntu/Debian/Mint ------
$ curl -s https://install.speedtest.net/app/cli/install.deb.sh | sudo bash
$ sudo apt-get install speedtest
------ On RHEL/CentOS/Fedora ------
$ curl -s https://install.speedtest.net/app/cli/install.rpm.sh | sudo bash
$ sudo yum install speedtest
Testing Linux Internet Connection Speed with speedtest-cli
1. To test the Download and Upload speed of your internet connection, run the speedtest-cli command without any argument as shown below.
$ speedtest-cli

2. To check the speed result in bytes in place of bits.
$ speedtest-cli --bytes

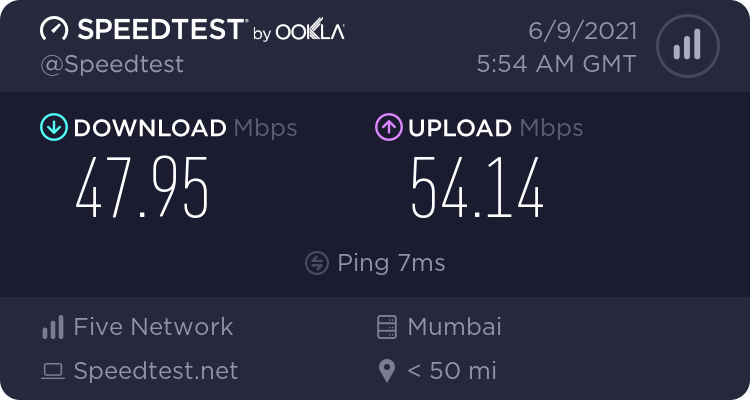
3. Share your bandwidth speed with your friends or family. You are provided with a link that can be used to download an image.
$ speedtest-cli --share

The following picture is a sample speed test result generated using the above command.
4. Don’t need any additional information other than Ping, Download, and Upload?
$ speedtest-cli --simple

5. List the speedtest.net server-based upon physical distance. The distance in km is mentioned.
$ speedtest-cli --list
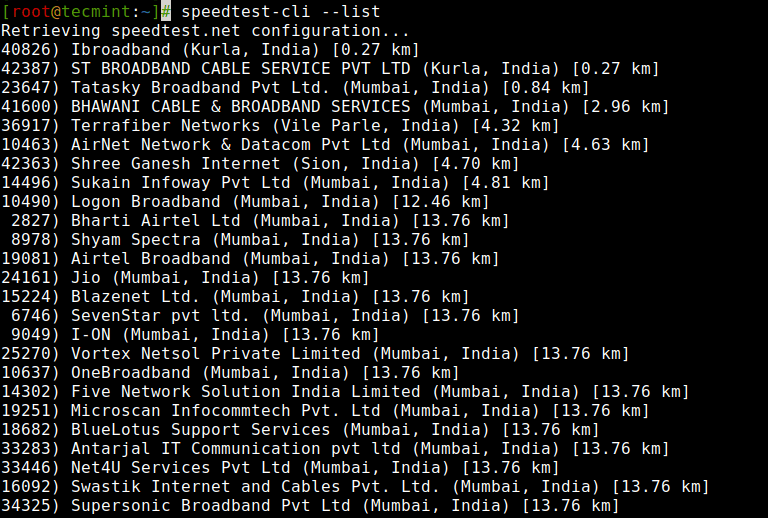
6. The last stage generated a huge list of servers sorted on the basis of distance. How to get desired output? Say I only want to see the speedtest.net server located in Mumbai (India).
$ speedtest-cli --list | grep -i Mumbai
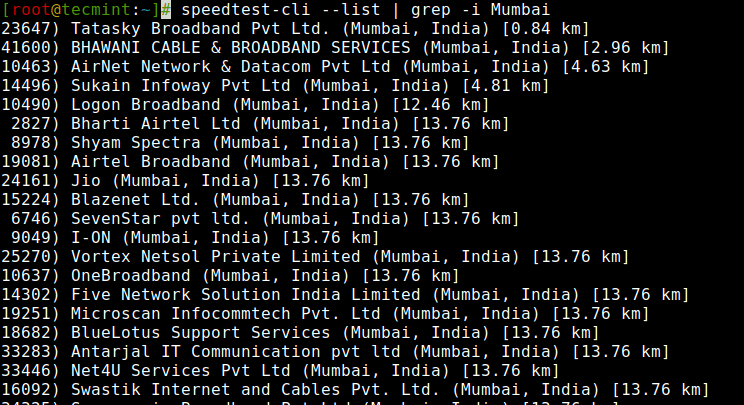
7. Test connection speed against a specific server. Use Server Id generated in example 5 and example 6 in above.
$ speedtest-cli --server 23647 ## Here server ID 23647 is used in the example.

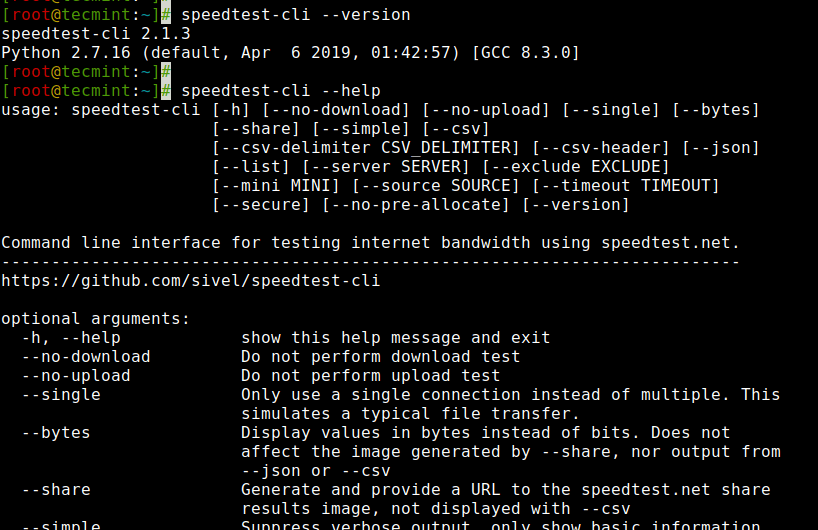
8. To check the version number and help of speedtest-cli a tool.
$ speedtest-cli --version
$ speedtest-cli --help
Note: Latency reported by the tool is not its goal and one should not rely on it. The relative latency values output is responsible for the server selected to be tested against. CPU and Memory capacity will influence the result to a certain extent.
Conclusion
The tool is a must for system administrators and developers. A simple script that runs without any issue. I must say that the application is wonderful, lightweight, and do what it promises. I disliked Speedtest.net for the reason it was using flash, but speedtest-cli gave me a reason to love them.
speedtest_cli is a third-party application and should not be used to automatically record the bandwidth speed. Speedtest.net is used by millions of users and it is a good idea to Set Your Own Speedtest Mini Server.
That’s all for now, till then stay tuned and connected to Tecmint. Don’t forget to give your valuable feedback in the comments below. Like and share us and help us get spread.



Ookla now has a native client for this surpassing speedtest-cli performance limitations: https://www.speedtest.net/apps/cli
This would be more useful if it could be used between two servers on the same internal network; between subnets and over VPN’s and not just “yet another internet speedtest” application.
I noticed that attempting to run:
‘speedtest_cli.py’
…from the terminal after the two packages were installed using ‘apt’, the result was no command found running Linux Mint 18.1). It appears that the correct command is:
‘speedtest-cli’ (with a ‘dash’ not an ‘underscore’ and no ‘.py’ at the end)
The above works fine although I tend to like to see the results in bytes not bits so I added –bytes at the end.
@Kirk,
If you’ve installed speedtest-cli using python-pip, then you will get speedtest-cli executable, and those who’ve followed Python script installation will get speedtest_cli.py.
I hope you get it..Thanks
Thanks – “speedtest-cli” worked for me
You said it “should not be used to record internet speed automatically”. Why? I’d like to have this scheduled to run regularly and keep a log of my internet speeds to use when addressing poor service with my ISP.
3. Share your bandwidth speed with your friends or family. You are provided with a link that can be used to download an image.
in this section, missing the example of the command line :-)
# speedtest_cli.py –share
@Verow,
Thanks for updating that missing command about sharing network bandwidth usage report, updated in the article..
I don’t suppose this will install on Mac OS?
Why do you say that? Mac OS is BSD under the covers. But, you will have to make sure Xcode is already installed first which is a free download from the Mac App store.
Do this in a Terminal window after you have installed Xcode:
1. Think of a location where you would want to keep the source files and “cd” into that directory, for example, I keep my sources in ~/src
2. Download the code from GitHub:
sudo git clone https://github.com/sivel/speedtest-cli.git
The above may generate a message saying you have to agree to Xcode’s license agreement before being allowed to use Xcode.
Type in “agree” when prompted.
3. You will now have a directory titled speedtest-cli; cd into this directory
4. Install the sources:
sudo python ./setup.py install
It should run without any warnings or errors (will get installed in /usr/local/bin).
5. Now you can run the following for the help screen (usage info):
speedtest-cli -h
couldn’t install speedtest-cli in centOS 6.7 . Following error occured:
yum install speedtest-cli
Loaded plugins: fastestmirror, refresh-packagekit, security
Setting up Install Process
Loading mirror speeds from cached hostfile
* base: mirror.tadu.vn
* epel: http://ftp.cuhk.edu.hk
* extras: mirror.tadu.vn
* updates: mirror.nbrc.ac.in
No package speedtest-cli available.
Error: Nothing to do
@Spandan,
There isn’t any speedtest-cli package available from Yum repositories, the only way is to install it from PIP tool as described in this article. So, first install pip package and then do pip to install the speedtest-cli package as shown in this article..
CENTOS 6.6
speedtest ver. 0.3.2
Change line 343 in the script
https
to
http
Voilà :)
Thanks waldi, for your acknowledgement.
keep Connected!