As we all know, the root user is king and wields unlimited privileges over the Linux system. However non-root users are limited to basic tasks. In addition, sudo users are only granted a certain degree of root privileges as deemed fit by the root user to perform specific elevated tasks.
Issues arise when regular users have uncontrolled access to resources or are escalated to root unintentionally. This is a serious security risk that could cause breaches, undesired modifications, and in the worst-case scenario, crashing of the system. Another potential risk is when files have less secure file permissions. For example, boot files with write permissions for global users could easily be modified or corrupted resulting in a broken system.
[ You might also like: Useful Tips for Securing Data and Linux ]
While we can implement physical, network, and data security, a malicious user can circumvent the security measures and take advantage of such security loopholes. It’s for this reason that file system security should be taken seriously. It provides an extra layer of defense in the face of attacks or insider threats from malicious employees who do not have to do the heavy lifting in circumventing security measures to access files.
In system security, we will concentrate on the following key points:
- Access rights – User and group permissions.
- Enforce password policies with the PAM module.
Access Rights – User and Group Separation
You must probably have heard that everything in Linux is considered a file. And if it’s not, it’s a process. Every file on a Linux system is owned by a user and a group user. It also bears file permissions for 3 user categories: User (u), Group (g), and Others (o). The permissions are represented in read, write and execute ( rwx ) for each user category.
rwx        rwx	     rwx
User       Group     Others
As seen before, in the Linux basics section, you can view the file permissions using the long format of the ls command as shown.
$ ls -l

Just to recap, the permissions are usually represented by nine characters. The first three characters represent the access rights of the actual user owning the file. The second set of characters represent the permissions of the group owner of the file. Finally, the last set for other or global users. These characters are perpetually in the read, write, execute (rwx) order.
After the permissions, we have user and group ownerships, followed by the file or directory size, date of modification, and lastly the name of the file.
Changing File/Directory Permissions and Ownerships
User permissions of files and directories can be modified as deemed fit. The rule of thumb is to use the least privilege security principle. Simply put, ensure users get the minimum access rights or permissions required to get the work done.
The principle of least privileges restricts users to certain roles only and by doing so, minimizes the risk of attackers accessing and modifying critical data by leveraging a low-lever user account. It also reduces the attack surface & limits malware propagation in the event the attacker takes control of your system.
Therefore, if a user only needs to view the contents of a file or directory, they should not be granted execute or write permissions. At the very basic level, only grant the least permissions and ownerships required by the user to accomplish tasks. We have tackled how to modify user permissions and ownerships on files/directories using chmod and chown commands in the basic Linux commands topic.
Sticky Bit Permission Mode
For the system administrator to have an easier time managing permissions, special permissions or access rights can be granted to entire directories. One of the special permissions that can be applied to restrict deletion and modification of a file or directory is the sticky bit.
Sticky bit
In a scenario where a shared directory can be accessed by all the users in the system or network, there’s a potential risk that some users can delete or modify the files inside the directory. This is undesired if you want to maintain the integrity of the directory contents. And this is where the sticky bit comes in.
A sticky bit is a special file permission set on a file or entire directory. It grants only the owner of that file/directory the permission to delete or make changes to the file or directory contents. No other user can delete or modify the file/directory. It has the symbolic value of t and a numeric value of 1000.
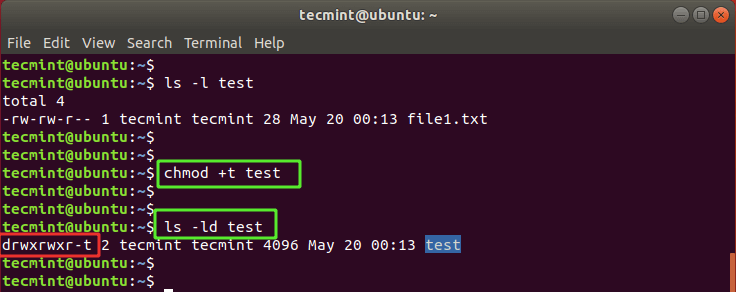
To turn on a sticky bit on a directory, use the chmod command as follows:
$ chmod +t directory_name
In the example below, we have applied a sticky bit to the directory called test. In the case of a directory, all the contents will inherit the sticky bit permissions. You can verify the sticky bit permissions using the ls -ld command. Be sure to notice the t symbol at the end of the file permissions.
$ ls -ld test
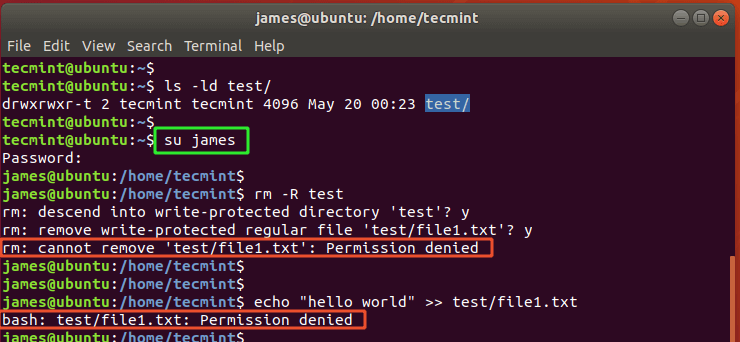
If another user tries to delete the directory or modify the file inside the directory, they are greeted with a Permission denied error.
And that’s the gist of the stick bit file permission.
Monitoring SUID & SGID Permissions
The SUID (Set User ID) is another special file permission that allows another regular user to run a file with the file permissions of the file owner. It is usually denoted by a symbolic value s at the user’s portion of file permissions instead of an x which represents execute permissions. The SUID has a numeric value of 4000.
The SGID, (Set Group ID) allows a regular user to inherit the group permissions of the file group owner. Rather than the x for execute permissions, you will see an s in the group portion of the file permissions. The SGID has a numeric value of 2000.
However convenient they turn out to be, the SUID and SGID permissions are associated with security risks and should be avoided at all costs. This is because they grant special privileges to regular users. If an intruder posing as a regular user comes across an executable file owned by the root user with a SUID bit set on it, they can use that loophole and exploit the system.
To find all the files with SUID bit set in Linux run the find command as the root user.
$ find / -perm -4000 type -f
For directories run:
$ find / -perm -4000 type -d
To find all the files with SGID bit set run:
$ find / -perm -2000 type -f
For directories execute:
$ find / -perm -2000 type -d
To remove the SUID bit on a file, run the chmod command as shown:
$ chmod u-s /path/to/file
To remove the SGID bit on a file execute the command:
$ chmod g-s filename /path/to/file
Enforce Password Policies with the PAM Module
It’s not uncommon for users to set weak passwords. A good number set short, plain, and easily guessable passwords to avoid forgetting them during login. While convenient, weak passwords can easily be breached using brute-force attack scripts.
The PAM module ( Pluggable Authentication Module ) is a module that allows system administrators to enforce password policies on Linux systems. To accomplish this, you need the pam_pwquality module that is provided by the libpam_pwquality library. The pam_pwquality module checks the strength of a password against a set of rules & a system dictionary and pinpoints weak password choices.
To install the pam_pwquality module on Ubuntu 18.04 and later versions, run:
$ sudo apt install libpam_pwquality
For RHEL / CentOS 8, run the command:
$ sudo dnf install libpwquality
The configuration file is found in the following location:
- On Debian-Systems – /etc/pam.d/common-password
- On RedHat Systems – /etc/pam.d/system-auth
Configuring the Password Policy
Before we start modifying the PAM configuration file, let’s first consider gathering insights about the password aging controls.
Password Aging Details
These can be found in the /etc/login.defs file.
The file contains the following key password controls:
- PASS_MAX_DAYS: Maximum number of days a password can be used.
- PASS_MIN_DAYS: Minimum number. of days allowed between password changes.
- PASS_WARN_AGE: Number of days warning given before a password expires.
The default values are indicated below.
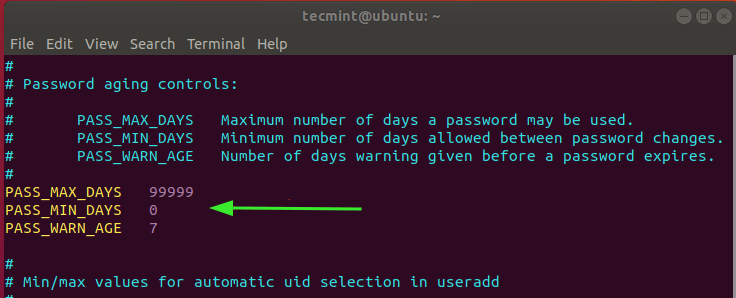
The PASS_MAX_DAYS attribute limits the number of days that a user can use their password. When this value is attained or the password expires, the user is compelled to change their password in order to log in to the system. By default, this value is set to 99999, which translates to 273 years. This doesn’t make much sense as far as security is concerned as the user can continue using their password for their entire lifetime.
You can set this to a meaningful value, say 30 days as shown.
PASS_MAX_DAYS 30
After 30 days elapse, the user will be forced to change their password to a different one.
The PASS_MIN_DAYS attribute spells out the minimum duration that users can use their password before changing it. What does this mean? If, for instance, this value is set to 15 days, the user won’t be able to change their password again before 15 days elapse.
PASS_MAX_DAYS 15
The PASS_WARN_AGE attribute specifies the number of days a user will get a warning about the impending expiry of their password before it expires. For example, you can set this to 7 days as shown.
PASS_MAX_DAYS 7
NOTE: These password controls do not work with pre-existing accounts. They are only applied to new accounts created after defining the rules.
Setting Password Complexity with PAM Module
Before you edit the /etc/pam.d/common-password file, create a backup copy. In this example, we have created the common-password.bak backup copy file.
$ sudo cp /etc/pam.d/common-password /etc/pam.d/common-password.bak
Then open the file.
$ sudo vim /etc/pam.d/common-password
Locate the line shown below.
password requisite pam_pwquality.so retry=3
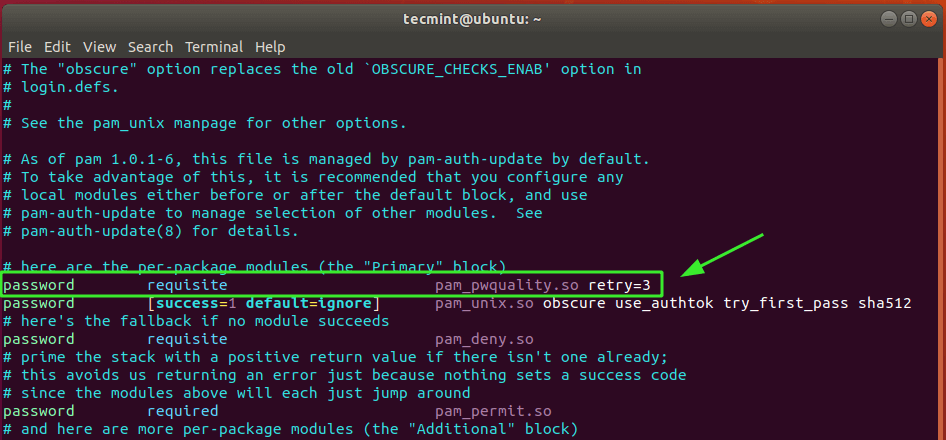
The retry option sets the maximum number of times you are required to enter the right password before getting an error. By default, this is set to 3. This is just one option and we are going to include several options.
Add the following attributes to the line:
minlen=10 difok=3 lcredit=-1 ucredit=-1 dcredit=-1 ocredit=-1 reject_username
Let’s flesh out these attributes.
- minlen=10: Sets the minimum acceptable size for the password. In this case, 10 characters.
- difok=3: This is the maximum number of characters that are present in the previous password.
- lcredit=-1: This is the minimum number of lowercase characters that should be present in the password.
- ucredit=-1: The is the maximum number of lowercase characters that should be present in the password.
- dcredit=-1: The minimum number of numeric characters that should be defined in the password.
- ocredit=-1: The minimum number of special characters e.g @, #, & that should be defined in the password.
- reject_username: This option triggers the rejection of the password if the password is the username either in straight or reverse format.
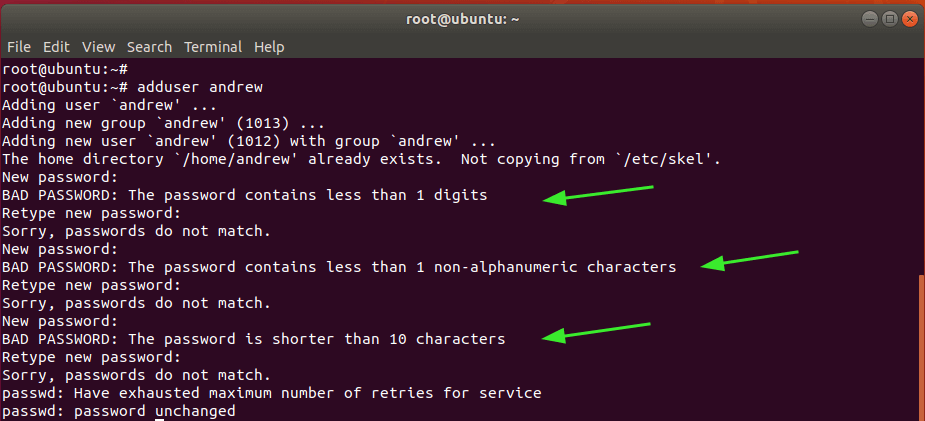
If you try creating a new user that falls short of the password policies, you are going to bump into such errors as shown.
Summary
This concludes the topic on system security and security fundamentals in general. In the entire chapter, we have shed the light on basic security measures that you can implement to safeguard your Linux system from malicious users such as hackers or disgruntled employees.

