A sound analysis of a computer network begins by understanding what are the available tools to perform the task, how to pick the right one(s) for each step of the way, and last but not least, where to begin.
This is the last part of the LFCE (Linux Foundation Certified Engineer) series, here we will review some well-known tools to examine the performance and increase the security of a network, and what to do when things aren’t going as expected.

Introducing The Linux Foundation Certification Program
Please note that this list does not pretend to be comprehensive, so feel free to comment on this post using the form at the bottom if you would like to add another useful utility that we could be missing.
What Services are Running and Why?
One of the first things that a system administrator needs to know about each system is what services are running and why. With that information in hand, it is a wise decision to disable all those that are not strictly necessary and shun hosting too many servers in the same physical machine.
For example, you need to disable your FTP server if your network does not require one (there are more secure methods to share files over a network, by the way). In addition, you should avoid having a web server and a database server in the same system. If one component becomes compromised, the rest run the risk of getting compromised as well.
Investigating Socket Connections with ss
ss is used to dump socket statistics and shows information similar to netstat, though it can display more TCP and state information than other tools. In addition, it is listed in man netstat as replacement for netstat, which is obsolete.
However, in this article we will focus on the information related to network security only.
Example 1: Showing ALL TCP ports (sockets) that are open on our server
All services running on their default ports (i.e. http on 80, mysql on 3306) are indicated by their respective names. Others (obscured here for privacy reasons) are shown in their numeric form.
# ss -t -a

The first column shows the TCP state, while the second and third column display the amount of data that is currently queued for reception and transmission. The fourth and fifth columns show the source and destination sockets of each connection.
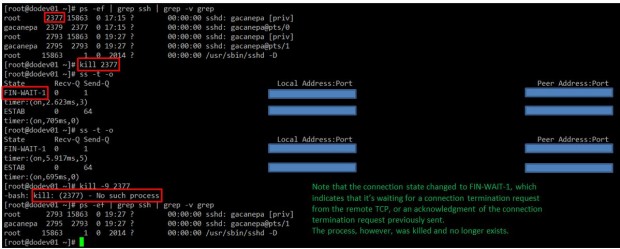
On a side note, you may want to check RFC 793 to refresh your memory about possible TCP states because you also need to check on the number and the state of open TCP connections in order to become aware of (D)DoS attacks.
Example 2: Displaying ALL active TCP connections with their timers
# ss -t -o

In the output above, you can see that there are 2 established SSH connections. If you notice the value of the second field of timer:, you will notice a value of 36 minutes in the first connection. That is the amount of time until the next keepalive probe will be sent.
Since it’s a connection that is being kept alive, you can safely assume that is an inactive connection and thus can kill the process after finding out its PID.

As for the second connection, you can see that it’s currently being used (as indicated by on).
Example 3: Filtering connections by socket
Suppose you want to filter TCP connections by socket. From the server’s point of view, you need to check for connections where the source port is 80.
# ss -tn sport = :80
Resulting in..

Protecting Against Port Scanning with NMAP
Port scanning is a common technique used by crackers to identify active hosts and open ports on a network. Once a vulnerability is discovered, it is exploited in order to gain access to the system.
A wise sysadmin needs to check how his or her systems are seen by outsiders, and make sure nothing is left to chance by auditing them frequently. That is called “defensive port scanning”.
Example 4: Displaying information about open ports
You can use the following command to scan which ports are open on your system or in a remote host:
# nmap -A -sS [IP address or hostname]
The above command will scan the host for OS and version detection, port information, and traceroute (-A). Finally, -sS sends a TCP SYN scan, preventing nmap to complete the 3-way TCP handshake and thus typically leaving no logs on the target machine.
Before proceeding with the next example, please keep in mind that port scanning is not an illegal activity. What IS illegal is using the results for a malicious purpose.
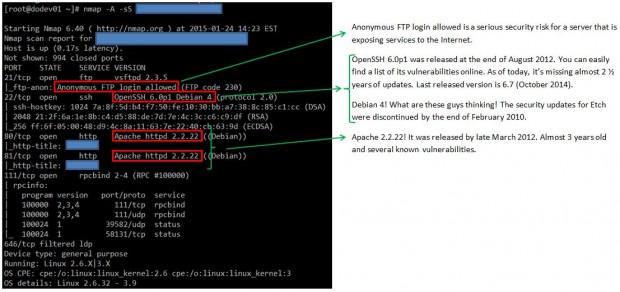
For example, the output of the above command run against the main server of a local university returns the following (only part of the result is shown for sake of brevity):

As you can see, we discovered several anomalies that we should do well to report to the system administrators at this local university.
This specific port scan operation provides all the information that can also be obtained by other commands, such as:
Example 5: Displaying information about a specific port in a local or remote system
# nmap -p [port] [hostname or address]
Example 6: Showing traceroute to, and finding out version of services and OS type, hostname
# nmap -A [hostname or address]
Example 7: Scanning several ports or hosts simultaneously
You can also scan several ports (range) or subnets, as follows:
# nmap -p 21,22,80 192.168.0.0/24
Note: That the above command scans ports 21, 22, and 80 on all hosts in that network segment.
You can check the man page for further details on how to perform other types of port scanning. Nmap is indeed a very powerful and versatile network mapper utility, and you should be very well acquainted with it in order to defend the systems you’re responsible for against attacks originated after a malicious port scan by outsiders.


@Gabriel , You have nicely explained the use of ss & nmap, kudos friend :).
OpenSSH 6.0p1 Debian 4 doesn’t mean that the server is running on Debian 4…
@undert4ker,
Would you be as kind as to point out the exact statement in this article you are referring to?
Passed both LFCS and LFCE exams :)
Thanks
@Artur,
Congratulations…:)
Thanks for this post, do you have the LFCE certification? I will take this exam in July and I need information, is very difficult the test? sorry for my english
Very thank you
@helloworld,
You’re welcome! Please keep coming back to Tecmint.com for more great articles and series. Also, feel free to spread the word!