Managing a RHEL 7 server, as it is the case with any other Linux server, will require that you know how to add, edit, suspend, or delete user accounts, and grant users the necessary permissions to files, directories, and other system resources to perform their assigned tasks.

Managing User Accounts
To add a new user account to a RHEL 7 server, you can run either of the following two commands as root:
# adduser [new_account]
# useradd [new_account]
When a new user account is added, by default the following operations are performed.
- His/her home directory is created (
/home/usernameunless specified otherwise). - These
.bash_logout,.bash_profileand.bashrchidden files are copied inside the user’s home directory, and will be used to provide environment variables for his/her user session. You can explore each of them for further details. - A mail spool directory is created for the added user account.
- A group is created with the same name as the new user account.
The full account summary is stored in the /etc/passwd file. This file holds a record per system user account and has the following format (fields are separated by a colon):
[username]:[x]:[UID]:[GID]:[Comment]:[Home directory]:[Default shell]
- These two fields
[username]and[Comment]are self explanatory. - The second filed ‘x’ indicates that the account is secured by a shadowed password (in
/etc/shadow), which is used to logon as[username]. - The fields
[UID]and[GID]are integers that shows the User IDentification and the primary Group IDentification to which[username]belongs, equally.
Finally,
- The
[Home directory]shows the absolute location of[username]’shome directory, and [Default shell]is the shell that is commit to this user when he/she logins into the system.
Another important file that you must become familiar with is /etc/group, where group information is stored. As it is the case with /etc/passwd, there is one record per line and its fields are also delimited by a colon:
[Group name]:[Group password]:[GID]:[Group members]
where,
[Group name]is the name of group.- Does this group use a group password? (An “x” means no).
[GID]: same as in/etc/passwd.[Group members]: a list of users, separated by commas, that are members of each group.
After adding an account, at anytime, you can edit the user’s account information using usermod, whose basic syntax is:
# usermod [options] [username]
Read Also:
15 ‘useradd’ Command Examples
15 ‘usermod’ Command Examples
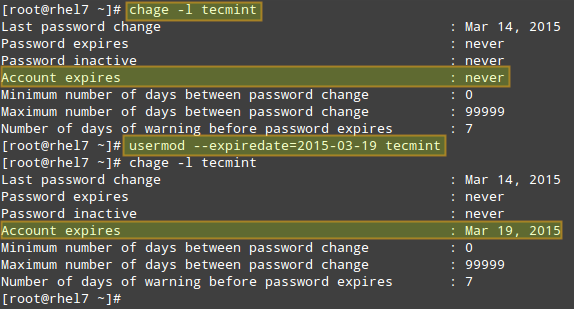
EXAMPLE 1: Setting the expiry date for an account
If you work for a company that has some kind of policy to enable account for a certain interval of time, or if you want to grant access to a limited period of time, you can use the --expiredate flag followed by a date in YYYY-MM-DD format. To verify that the change has been applied, you can compare the output of
# chage -l [username]
before and after updating the account expiry date, as shown in the following image.
EXAMPLE 2: Adding the user to supplementary groups
Besides the primary group that is created when a new user account is added to the system, a user can be added to supplementary groups using the combined -aG, or –append –groups options, followed by a comma separated list of groups.
EXAMPLE 3: Changing the default location of the user’s home directory and / or changing its shell
If for some reason you need to change the default location of the user’s home directory (other than /home/username), you will need to use the -d, or –home options, followed by the absolute path to the new home directory.
If a user wants to use another shell other than bash (for example, sh), which gets assigned by default, use usermod with the –shell flag, followed by the path to the new shell.
EXAMPLE 4: Displaying the groups an user is a member of
After adding the user to a supplementary group, you can verify that it now actually belongs to such group(s):
# groups [username]
# id [username]
The following image depicts Examples 2 through 4:

In the example above:
# usermod --append --groups gacanepa,users --home /tmp --shell /bin/sh tecmint
To remove a user from a group, omit the --append switch in the command above and list the groups you want the user to belong to following the --groups flag.
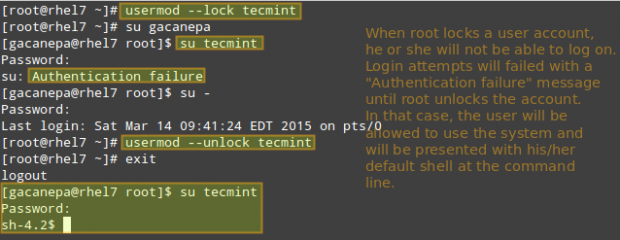
EXAMPLE 5: Disabling account by locking password
To disable an account, you will need to use either the -L (lowercase L) or the –lock option to lock a user’s password. This will prevent the user from being able to log on.
EXAMPLE 6: Unlocking password
When you need to re-enable the user so that he can log on to the server again, use the -U or the –unlock option to unlock a user’s password that was previously blocked, as explained in Example 5 above.
# usermod --unlock tecmint
The following image illustrates Examples 5 and 6:
EXAMPLE 7: Deleting a group or an user account
To delete a group, you’ll want to use groupdel, whereas to delete a user account you will use userdel (add the –r switch if you also want to delete the contents of its home directory and mail spool):
# groupdel [group_name]        # Delete a group
# userdel -r [user_name]       # Remove user_name from the system, along with his/her home directory and mail spool
If there are files owned by group_name, they will not be deleted, but the group owner will be set to the GID of the group that was deleted.





EXAMPLE 5: Disabling account by locking password
To disable an account, you will need to use either the -l (lowercase L) or the –lock option to lock a user’s password. This will prevent the user from being able to log on & in example 6 as well:
Its capital L and capital U: not the small ones. small -l is used for new login name and -u is for userid. Please correct it.
@Neeraj,
You are correct.
@Ravi,
Please correct this in the writeup.
@Neeraj, @Gabriel,
Corrected in the article a suggested..
Great, being an RHCE was going through the articles so that can refer the same to the newbies. Being an OpenSource supporter, don’t think to re-write the things when something is already well written. Good job done, friends.
Which license have this session? Can I translate it?
@Pavlo,
No, you can’t translate to any other language…
Thanks Ravi.
Thanks for the tutorial on user management. Is it possible to explain about awk command with good examples for beginner.
@Satish,
Awk command series under progress, I hope the first part will going to be published today..stay tuned for updates….